18/04/2013

klystrack tutorial - drums: snares

Today we're going to take a quick look at snares.

If you were to take the three most basic elements of a drum kit, the kick, snare, and hi-hat, you would quickly notice that each of them is playing in a different register. The kick hits in the low-end and the hi-hat is doing its funky thing up there in the high frequencies. While all of this is happening, the snare is played in the mid-range. The mid-range is where most of the music is happening, so snares usually need to be quite loud in order to come through the mix.

Snares are generally a short burst of mid-range rattle. On a traditional kit, this rattle is achieved by having beads or chains, called snares, stretched across the skin of a fairly high-pitched drum. The tighter the skin and chains, the shorter and snappier the snare gets. Loose chains result in a "washy" snare. Electronic snares have traditionally used some kind of noise oscillator to simulate this type of sound.

Most snare sounds are made up of two components, a tonal element, and a noise element. It's not absolutely necessary to have both but it helps a lot. A snare made purely out of noise tends to be a bit thin, and a snare made up of only a tonal element is kind of like a really high pitched tom and only truly works in a fairly minimal and empty mix.

There is no right or wrong here, and you can get almost endlessly creative with your snare sounds as long as you respect two simple concepts. First, it has to be in the mid-range. Low-mid, pure mid, high-mid...that's a matter of choice and should be just fine as long as it fits your mix. Second, the attack should always be short. It should snap into existence and start to fade right away. You can fade a snare in for effect, but that's not to mark the beats, that's just for added flavour.

So then. Let's look at some snares. Oh wait. I realize that in the last tutorials I wasn't as funny as usual, so...this guy walks into a store and asks if they have helicopter flavoured chips. The clerk says no sorry, we only have plain.

Alright, with that out of the way...snares.

the NES snare
Due to the fairly limited number of channels on the NES and the fact that each channel is locked to a specific waveform, synthesized snares on this machine tend to be made with only noise. Very rarely will a composer "waste" space on the pulse or triangle channels to add a tonal element to the snare. This probably explain why most people tend to use the PCM channel to play sampled snares instead. But back in the days, space was at a premium on cartridges and not many developers wasted that storage on samples until very late in the console's life. Pure noise snares tend to be really thin, and the only thing truly separating them from hi-hats is the length. For this reason, a lot of percussion tracks in NES soundtracks were made of only a few quick noise hits (often, only one) that would be played at varying pitches.

From a default instrument, simply lock the pitch anywhere from C5 and up (B6 in the example) and enable only the noise oscillator. Adjust the decay to whatever fits your need (08 in the example) and there you have it, the most basic of all synthesized snare sounds. 

the C64 snare
I remember so many games and demos from the C64 era that had these amazingly aggressive and punchy snares. The best way to describe them is that they initially play the tonal element for a very short time, then switch to pure noise for the fading part. To achieve this, we'll have to make some magic happen the in program editor.

First lock your pitch at G3 and turn on your pulse oscillator and set it to pure square (7FF). Now turn on the Drum option and adjust your envelope to an ATK of 00 and DEC of about 05. And last setting to change is the program's P.PRD speed which should be set to 01. The rest of the sound will all be made in the program editor.

Since the Drum setting is on and we're using a square wave, the first thing that will happen when we trigger a note is a short noise burst (pitched at G3). This happens at the same time as our square wave starts playing. It will start on G3, then pitch down for two ticks at a speed of FF. This is what the first two rows (02FF) of the program do.

On the third tick, we want two things to happen simultaneously. We want to change the pitch up so that our noise element is clear and thin. We do that by entering a high note as if we were programming an arp. I chose 0034 here since it represents B7, the highest possible note. The next thing we want to do is cut the pulse wave off and replace it with the noise oscillator instead. This is achieved by using the Set Waveform command 0B01. This command is a binary command, and the numbers are expressed in hexadecimal. Since I don't feel like explaining it the right way, I'll explain it the dumb way: 0B00 is no oscillator, 0B01 is noise, 0B02 is pulse, 0B04 is triangle and so on with numbers 0B08, 0B10, and 0B20 all representing a specific oscillator. To activate more than one at the same time, you add the numbers. So to play the noise (01) and pulse (02) at the same time you would use the command 0B03. For saw (08) and wave (20) at the same time, the command would be 0B28. The status bar at the bottom will show you which waveform you are turning on so it should be easy to figure it out. So by entering 0B01 on the third row, we're setting the active waveforms to noise only, effectively cutting the pulse off at the same time.

Now that we have these two commands (0034 and 0B01) entered, we select the first one and press space to link them both together so they play on the same tick. The last command we input is FFFF which means the program will simply stop running once it reaches this point. And that's about all there is to making a C64 type snare.

the handclap
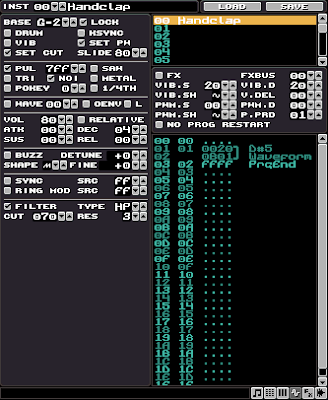
While a clap is not really a snare per se, it usually serves the same purpose in a beat, and it's synthesized using pretty much the same techniques. Even if there is no drum skin being hit in an actual handclap, there is still a tonal element to it. You can experiment yourself by changing the 'cup shape' of your hands while clapping. The deeper the cup, the lower the clap sound. The noise element of a clap is usually made by the speed at which the hands are clapped and the room reverberation. So how do we simulate this with something as basic as Klystrack?

Start by locking your pitch at G2. Turn on both the Pulse (7FF) and Noise oscillators, and set your envelope to ATK 00 and DEC 04. Finally, adjust the P.PRD to 01.

In the program editor, skip the first row. This means that for the first tick both the Pulse and Noise will play unmodified at a pitch of G2. The two rows do pretty much the same thing as in the previous example. They will, on the same tick, change the pitch up, and let only the Noise oscillator play. This time I chose a lower pitch (0020) because claps are more meaty so we want to keep the noise's pitch lower than for a snare. Don't forget to link those two rows together, and end your program with an FFFF command.

Now if you play that you'll notice it's still quite similar to a snare. That's where we use the filter to finalize the sound into a clap. Turn on the filter and set it to HP, with a CUT of 70 and a RES of 03. This will cut a part of the low frequencies in the overall sound, and will introduce a peak in the low-mids because of the high resonance setting. And voila, a pretty damn convincing clap sound.

a few extra tips
using the filter
As you have seen with the clap sound, using the filter than totally change the nature of a sound. Using a high resonance HP filter with a low cutoff point will make your snare less bassy, and will add a bit more mid-range crunch to it. This can be used on almost any snare sound to make it pierce better in a thick mix, or if you want to add more separation between a low snare and a high bassdrum and ensure they don't step on each other in the mix.

Another thing I like to do is add subtle filter sweeping to snare sounds. I will usually use an HP filter and sweep it up a little (command 21xx) during the "fade" part of a snare. I use this to thin out my snare and make it seem a little shorter in the mix while retaining the highest frequencies.

two-stage envelopes
While a lot of percussion sounds can be done quite well with a simple attack and decay envelope, you can get much more dynamic results by introducing the sustain phase of the envelope to percussions. The problem however is that normally to use a sustain, you have to also use the release and nobody in their right mind wants to have to trigger the release manually in the pattern data for every single drum sound. It's just a crazy fucking amount of work. You can work around it in two ways.

The most obvious is to use the Trigger Release command in the program editor. Simply enter command FC00 where you want the sound to move from sustain to release. While this is good and it works totally fine, I prefer to fade my sustain manually using 0Axx commands instead.

The big advantage of using two stages in your envelopes is that your decay will take the sound from full volume to the sustain value. By using a sustain value that is lower than full volume, you can use the decay part of the envelope to add a little short punch at the beginning of your sound, making it pierce a little more clearly in a mix. You will lose some overall volume on your instrument, but that can be compensated by moving its general volume above 80.

This can be used to add a sort of fake compression to your sound too. The decay part will represent the sound before the compressor kicks in, and the sustain part will represent the compressed sound. It can also be used for faking gated reverb effects, or add a reverse effect at the end of your snares. Experiment, it's a lot of fun and it adds a lot of personality to your instruments. Look at the example to see how it's done. Notice the sustain volume is set to 08, which is half the full volume.

end transmission
There we have it. A quick and dirty guide to basic snare sounds, hope you found it informative. And if not, then you can just eat a bag of dicks. Next tutorials, the hi-hats. Suggestions, comments and death threats in the little box thing at the bottom.


08/04/2013

klystrack tutorial - drums: bassdrums

I have been thinking of writing instrument tutorials for a bit now. It was also suggested by my good buddy and mega rockstar pixel pusher god-tier artist ilkke to write some drum sound tutorials. I wasn't too sure of how to approach this at first. For a while I considered just creating half a shit ton of instruments and releasing them as a pack for people to use, but then I thought it would kind of defeat the purpose of what I'm trying to do here, which is to teach people how to do things themselves.

After trying a few times to write something intelligible, I quickly realized that blogging is very much a one-way monologue type thing and I have no idea where you guys are starting from. Have you programmed instruments before? Have you ever used a synth? Do you have knowledge of basic synthesis? Do you look in the tissue after you blow your nose? Where the fuck do I start? 

So eventually I decided on this format you're about to read. I will discuss what makes up a particular type of sound, then give a few variations on each sound and explain how I am programming it. These should serve as example for you to base your own instruments from and hopefully they help you understand how a particular sound is achieved. Most of the options I use will not be explained as they've all been discussed in the first instrument tutorial. 

I am going to try to be as clear and basic as I can be but if there are words that are unclear to you, or concepts that escape you, you are responsible for educating yourselves on the matter. Google that shit, bro. Deal? Good. Then we can start.

a few quick tips
1) Never edit instruments using headphones. There are three reasons for this. Since headphones are very close to your ears and give you complete stereo separation, you are more than likely to undermix three things when working with them: bass, chorus, echo. It is a good idea to revisit a song's mix in headphones once it's been mixed properly for speakers, but it's not a good place to start to edit instruments.

2) Name your instruments properly. It's a step a lot of people don't bother with when they are just doodling quick sketches for songs, but when that sketch hits the three minutes mark and you have 25 instruments in the bank, you don't want to have them named stupid shit like "burger ninja condom". It only takes you a few second to give it a proper name like "Short PWM Lead + Chorus" and it will save you lots of time later on.

3) Less is more. You should always try to avoid giving an instrument a volume above 80. These instruments will pile up in a mix and can quickly result in distortion. Furthermore, if an instrument is already set to max (FF) volume and you need to make it even louder...there's no more place for it. So whenever possible, consider bringing the rest of the instruments down instead of boosting one too high.

4) Since drum tracks are made up of multiple sounds, it's useful to have them in the first few instrument slots so you can quickly switch between each with the numpad when editing patterns. It's less important with bass/lead instruments because you usually just select them once, then edit your pattern without switching instrument again. I personally always use the same format where my instrument slots, starting from 00 are: bassdrum, snare, closed hat, open hat, tom, etc etc. 

5) Always create instruments from scratch. Yeah ok... that one is a bit subjective but still. Since chiptunes don't have such a huge array of sound textures available to begin with, they already all sound quite similar to one another. Avoid re-using the same old bassdrum in every song or you will make this problem even worse. Plus, this forces you to get to know your synth engine better, be able to get more juice out of a few simple oscillators and eventually develop your own sound. 

the bassdrum
Definitely one of the most important element of a good rhythm track is the bassdrum, or kick as some people like to call them. While there are many different flavours of bassdrums, they're all based around a few key concepts. The first and most of obvious, given the name, is that they play in the low register. There is a sweet spot you are trying to get to where the kick sits comfortably on the low end of your track, not too high, not too low. Go too high and it doesn't accentuate the beats, go too low and it muddies up the mix and gets lost in the rumble.

The second element is that they almost invariably always start with a short, high pitched snap. On a real drum kit, this is the moment where the beater hits the skin. This snap is also a valuable tool to make your bassdrum pierce clearly through the mix while not eating too much outside of its register. There are many ways to achieve this. It can be a pitch effect, or a short burst of white noise for example. There are no rules to how you achieve that snap, but it should be short. If it's too long you'll lose the punch effect you're looking for.

The third and final element almost all bassdrums share is that once the snap is over, they settle into a descending (in pitch) tone that is more often than not outside of the usable note range. Unless you're going for a very specific type of bassdrum that ends in a sustained, pitchable note, you will want it to be atonal so as not to create weird melodic dissonance in your song. 

Now let's take a look at a few types of kicks.

the C64 kick
I call this one the C64 kick because...well because. It's a very simple kick that sounds like a lot like what you'd find in an old C64 game soundtrack. I am using a full square wave (7FF) because it has a lot of punch, and stays very bright all the way through. Like all my kicks, I lock the pitch so what every note triggers the exact same kick to make sure that entering notes of a different pitch in the patterns won't result in the kick getting pitched as well. The Drum setting is used because that gives it a short burst of white noise at the start. I use and envelope with an ATK of 00 to make sure it doesn't fade in even by the slightest bit, and a Decay of 05 to keep short and sweet. The only other thing involved here is in the Program where I use a portamento down effect (02FF) followed by a GoTo (FF00) command that loops the program back to the first row, making it pitch down by FF on every tick. Quick, dirty and simple. 


the fake 909
Okay so this doesn't nearly have the character and punch of a real 909, but it's still a fairly acceptable clone. For this one, I am again locking the pitch to C4 but this time I turn off the Drum setting because I don't want the white noise snap. I use a triangle wave instead of the pulse since it has a much more subdued sound. The envelope still has an ATK of 00 to make sure it snaps instead of fading in, and this time I use a slightly longer Decay of 07. The Program is very similar to the previous kick but since I wanted it to pitch down faster that a single 02FF command would, I used to 02AF commands and linked them together (press space) to play at the same time.


the fake 808
The 808 is another classic kick and this one requires that we look outside the oscillators for a sound source. Go into the wave editor, select wave 00 and then press the Generate A button at the bottom. Now we have a basic sine wave to work with. Back in the instrument editor, simply turn on Wave 00 and turn off every other oscillator. You will want to leave the envelope's ATK to 00 to get that nice little snap at the start, and Decay is really up to you. The 808 was capable of making short kicks, but it is mostly well known for it's long deep kicks, so in this example I am using a Decay of 0B. Lock the pitch of the instrument to something around G4. Now in the program editor, set the P.PRD setting to 01 because we want to have the program play as fast as possible. Here I am using four consecutive 02FF commands linked together, which means the pitch will go down by FF four times in a single tick. Then I used a 0210 portamento command on row 04 and then use a GoTo command to loop back to that row. What this will do is play the first four rows in a single tick for a quick pitch down effect, then loop row 04 for a slower pitch effect. 


end transmission
So there you have it, basic bassdrum sounds. There are tons of ways you can improve/expand upon these concepts of course, but it's up to you to fuck around with the options and come up with your own sounds. In the next few tutorials I'll be discussing other sounds like snares and hihats, more advanced envelopes done manually in the Program, and give you a few techniques on making convincing drum tracks. Stay tuned.

29/03/2013

klystrack tutorial - arpeggios

If there is one sound that defines what chip music is all about more than any other, it's the arpeggio. An arpeggio is simply a group of notes that are played one after the other. Now I know that sounds awfully generic a description, and that it could apply to any series of note, but there are a few things that make an arpeggio different from, let's say, a solo. 

what's an arpeggio?
The first defining element of an arpeggio (here after simply called arp because I'm lazy) is that it is a broken down chord which has its notes played one after the other. There are many ways to play these notes. You can play them in order from low to high, high to low, or mix those two modes and go up then down, or down then up. You can even have your own personalized order for those notes to play in. Since any three notes will form at least part of a chord, there really are almost no limitations to what notes you can use to form an arp.

The second defining element of an arp is that is it usually repeated more than once in order to establish the chord it is based on. This is not a requirement per se, but it is extremely common. Take for example that German dude's moonlight-related sonata-type diddy. What you hear at the beginning is an arp. It is a deconstructed Dm (D minor) chord with the notes being played repeatedly from lowest to highest.

An arp can also be spread across octaves by chaining the same sequence of notes at a higher or lower octave, creating longer arps with more movement to them. There are endless ways to be creative with arps since there are really not many rules holding the concept together. You could for example have a Dm arp that plays up the three notes in the middle octave once, then repeats the same notes in an up/down pattern an octave higher after that. 

The important thing to remember is that an arp is used to establish a chord without playing all the notes together at the same time. Other than that, you're pretty much free to go crazy with it. Some of the more classically trained individuals out there might argue, but fuck them.

the chip arp
The birthplace of the chiptune arpeggio is the Commodore 64 and its "invention" is usually credited to mega monster chip god Martin Galway with the score to Kong Strikes Back!. Since that old piece of crap (the C64, not Martin) had only three notes of polyphony, people found creative ways to cram more music in those measly three channels. 


On a piano, when you hold the sustain pedal and finger an arp, each new note rings with the others thus easily establishing the chord. On the C64 however, each new note would cut off the previous one. It would still establish the chord, but in a much weaker way when these notes were played slowly. 

The solution was speed. By playing arps incredibly fast, it gave the impression of all three notes being played simultaneously, but they still used up only one channel instead of three. It also had this very electronic texture to it, texture we all know and love now as one of the main chip music element. 

Another important element of chip arps is that it is also often used to establish intervals rather than chords by using less than three notes. More on that later.

how it works
Most chip music software use a system of 'ticks' to control its timing. A single tick being the smallest possible time element. A single row of a pattern is usually three to six ticks long depending on your project settings. Some software use a different timing system but the effect is virtually the same. 

When playing an chip arp, each note of the chord will be played for a set number of ticks. Since there are many of them per pattern row, it then becomes possible to play most, or all of a chord's arpeggiated notes on a single row. Typical settings for chip arps use 1 to 3 ticks per note. You can of course use more, but the more ticks per note, the slower the arp is. If played too slow, you start losing the distinctive chiptune sound and you enter the more traditional, classical arpeggio. In Klystrack, the speed of your arps is determined by the P. PRD setting in the instrument's program, which is essentially the number of ticks per note. 

There are two basic methods for creating arps for chip music. The first one is to include the arp's notes directly in the instrument, which is called a static arp. The second method, dynamic arps, decides which notes are part of the arp on the fly with pattern effects. Both methods have their pros and cons.

how to create static arps
Basic saw wave settings.
Static arps are created by entering the arp data directly into an instrument. Their main advantages is that they can easily be used on any note thus transposing the entire chord to a new root, as well as not having to enter any pattern commands when using them, thus freeing up the pattern command column for something else like filter sweeps, portamentos and whatnot.

The main disadvantage is that for complex chord progressions with inverted chords, you tend to eat up a lot of instrument space quickly since you need an entire new instrument to make a different chord, or variation/inversion of a chord.

In the following example we'll create arps for the two most common chords in music, the major and the minor chords. Let's start with the major.

Start by selecting an empty instrument and going in the editor. Give the instrument a name, like "Major Arp" or "Monkey Ninja". You can select whatever you want in terms of oscillators and envelopes, but for the purpose of this example we will use a plain saw wave with everything else left to default settings.

A major chord, broken down.
The next step is to enter the actual chord recipe in the program editor. Since we're making a major chord arp first, we need to know exactly what are the notes for that chord. Fortunately, you're sitting in front of the internet right now so you shouldn't have too much trouble finding that information. A quick Google search will tell you that the intervals, in semi tones, for a major chord is 0 (the root), 4 (the third) and 7 (the fifth).

Now click the program editor and input these numbers on the last digit of each row. You will see that Klystrack will tell you what actual note this interval represents based on your instrument's base note. Since the default is C, you will get C, E and G in the program.

The last step is to make everything loop neatly. For that we will used the Goto command. This command has two components, the command itself, and the destination. For example FF00 will make the program jump back to row 00, and FF09 would make the program jump to row 09. Since we want this arp to repeat from the beginning each time, we will use FF00. This will make the program play the first three rows sequentially, then loop back to row 00. 

Playing a C note with this instrument will then give you a C major arp. Since chord triads always use the same intervals no matter where they start from, if you play a D note with this instrument you will get a D  major chord and so on. So from this point on, whenever you need a particular major chord in your song, you can use that instrument and just enter the root note of the chord you want to play and voila.

Same concept, but for a minor chord.
Now select a new instrument, and repeat the process for a minor chord. The only difference is that the minor chord uses a flattened (one semitone down) third. So if the major was 0-4-7, then the minor is simply 0-3-7.  Go ahead and input this in the program editor and you will get a minor arp. As with the previous instrument, whenever you need a minor chord, all you need to do is select your "Minor Arp" instrument and enter the root note of the chord you're looking for in the pattern. 

And there you have it. With these two instruments you should be able to easily recreate just about 90% of all the music in the last 50 years...really.

Now for your homework, go on the intertubes to find more triad recipes like these and just keep repeating the same basic process. There are quite a few other triads available, like augmented and diminished chords.

how to create dynamic arps
Dynamic arps have no fixed notes. The first note in the arp will be whatever note you enter in the pattern, and the other two are assigned on the fly during playback with pattern commands. The two main advantage of dynamic arps is that you only need to use up one instrument to create many types of chords, and they make it really easy to invert triads for better voicing.

The biggest disadvantage is that there is only two dynamic notes you can assign so in most cases you're limited to triads. You can go beyond triads but you will need to create new instruments for each variation. 

Notice the EXT notes.
Let's start from the same point as we did for static arps and create a new instrument from a basic saw wave, leaving everything else on default settings. Now instead of entering the specific intervals for each note of the chord, we will change the last two notes of the triad to floating notes that we can then change directly from the patterns. This is done with the 00F0 and 00F1 commands. Start by entering 0000 on the first row, which will be the note on which the arp starts from, and then enter 00F0 and 00F1 on the next two rows. You will notice that instead of actual notes being identified on the side, you get EXT0 and EXT1, which mean external data (patter commands) will be used to determine the note to play on that row of the program. As with the static arps, make sure to include an FF00 command at the end to make it loop neatly. 

So how do you use those? Well let's say you wanted to make this instrument play a C major chord. First start by entering a C note in your pattern, then move to the pattern command column next to that note and use the command 0047. Remember this 4-7 from the last example? This will use the note you just entered as starting point (row 00 of the program) and then play a 4 semitone interval for EXT1 (row 01) and a 7 semitone interval for EXT2 (row 02), essentially giving you the same results as the major static arp we created earlier. This makes it really easy for you to change the nature of the chord by simply entering new numbers in the pattern command column of your patterns.

C what I did there?
The example to the left shows you how to trigger different C arpeggios from a single instrument by simply changing the 00xx command. Since the first row of your instrument program (0000) will basically play the note you enter in the pattern, it's possible to transpose these chords anywhere you want just as you can with static arps. If you were to replace the C note in this example for F, then you'd effectively be playing F, Fm, Faug and Fdim. Note that once you enter a 00xx command in a channel, this command remains valid until it is replaced by another one. This means you do not need to enter the command every time you trigger a note. The arp will play whatever 00xx was last used in that channel.

Invertamaterized!
The other, and biggest advantage of dynamic arps is the possibility to easily invert chords for better voicing. In the example on the right, what you see are three different ways to play a C major arp. The first one is the traditional way to play the chord. It will start on a C, then play four semitones up (E), and then seven semitones up (G). 

The other two are simply inverted variations of the C chord. Take the G for example. Since it is accompanied by the numbers 5 and 9, the arp will start on a G, then play five semitones up (C), and then play 9 semitones up (E).  If you take one that starts on an E, you will see that it ends up playing E, G and then C. In all three cases the notes being played are the same, C-E-G, but in a different order. This is called inverting a chord and we'll get back to it a bit later.

fitting complex chords in triads
Complex chords are chords that use more than three notes. Obviously some aren't very complex, simply adding a fourth note to the mix, but it can quickly get out of hand, especially if you let a jazz fan near your piano. As a rule of thumb, you should always keep jazzmen out of your house. They will crash on your couch for weeks and eat all the damn food. They also smell vaguely of boiled cabbbage.

But still here you are with this nice chord progression you're trying to render with chiptune arps and the last chord of that progression is one of those pesky dom7th chords. How do you make a four note arp? Well the easy way out is obviously just to add another row to your program and enter the note there. Problem solved right?

Well yes and no. It's certainly a valid way of doing things and if this fits your particular needs then you're all done here. But it doesn't always sound right however. Since these arps are played really fast, adding an extra note in the sequence changes the texture of the "chip sound". You will find that four note arps do not sound as "fast" as three note arps simply because it takes a wee bit more time to loop back to the first note. 

Fortunately there's an easy-ish solution for fitting complex chords in three little notes. And yes, the solution is a stupid as you think it is: remove some notes. But won't that change the nature of the chord? In a way it will, and in a way it won't. Let's take one of the more common complex chord, the C dom7th, also called C7 for friends and family. This is primarily a C major chord, with an added flat 7th. In this case, the A#. So what we want to preserve even though we're removing notes is those three elements: we're playing a C, it's major, and it's got a flat 7th to it.

The easiest note to remove is almost always the root, C in this case. In most cases, this note is already being played somewhere else by another instrument, most likely the bass. So it's pretty safe to remove it since there are other tonal elements in the song supporting the fact that the chord is a C. You're left with E-G-A#. technically, this is an Edim chord. But as long as the rest of your song doesn't strongly suggest you are currently in E, and rather implies your're in C, then the overall texture of the song will be a C7. A major chord is also much stronger than a diminshed chord (which is really one of the weakest chords) so it doesn't take much to convince the listener you're in fact, playing a C.

The second easiest note you can remove from a chord is the dominant fifth, in this case, the G. The dominant's job is kind of to reinforce the root. If you remove the fifth, you're left with C-E-A#. These three notes together do not form another chord simply because there's not enough space between A# and C. So even if there's no G at all anywhere in the rest of your music, you're pretty much assured that the idea of the C7 is getting across just fine. And since the chord establishes itself without the help of other instrument, your bass line doesn't really need to establish the root and is free to wiggle about and do more interesting stuff.

The last note you can remove from that chord is the third, in this case the E. The third is really what gives your chord its minor or major character. If you remove it, you're left with a power chord (root + fifth). Since we're trying to preserve the original chord as much as possible, this note should be the last one you consider removing. But it can still be done. The remaining notes, C-G-A# still do not form a new chord because of the interval between A# and C being too small so in a way you still retain that C7 flavour, albeit without the major gravy on top. The moments when it's safe to remove the third from chord and keep that major tint to it is when the rest of your chord progression implies that this C chord would be major. So if you're in the key of C major, then removing the third can be done with relatively little impact on the chord itself.

So you could write a C7 arp (the static kind) by playing a C in the pattern, and have the instrument play either of those interval combination: 4-7-10, 0-4-10, and 0-7-10. You're left with a three note arp that won't sound too different from your basic triads in terms of texture and speed.

For even more complex chords, five notes and up, fitting them into a three note arp can be a little more challenging. You will need to look at what else is playing in your song that will imply that the notes you remove are still somehow being played. This can be as direct as having another instrument playing that note, to something as subtle as having your chord progression imply the missing information is still there. Fun times ahead.

voicing your arps
Chords can be inverted. What that means is that it doesn't really matter on which note you start, as long as you play all the correct notes, your chord will come across. They don't even need to be next to one another, you can spread them across the octaves if you want. Of course too much distance between the notes will sound a bit meh, but it will still technically be the correct chord.

I'm a god damn comedian.
Let's take the C major chord, again, as example. The natural chord is played C, then E, then G. From lowest to highest note. If you take your C note and put it an octave higher instead, you still get a C major chord, but this time it starts on a G, and ends on a C, giving it a different flavour while still remaining a C major. This is called the first inversion. Now start from that, and move the E an octave higher. Still a C major chord since it's all the same notes again, but this time you're in second inversion. With this technique, it's possible to shift your chords up or down in pitch while keeping the chord intact. 

It's when you start applying this to chord progressions that you really start to understand what voicing is all about. Let's take an easy chord progression and play with it a bit. We'll start from the classic 1-4-5 progression in C major. This progression is simply three major chords one after the other: C major, F major, and G major. This is how you'd play the progression using only natural shapes.


While this works just fine. There's no escaping the fact that the progression keeps going up in pitch. It also sounds quite elementary, a bit as if you'd be playing something out of your first few lessons of piano. What if we'd rather have a descending pitch for this progression instead? Well in that case we could do something like this instead.

Same basic chord progression, but now with a descending pitch. Another way to play the same progression would be keeping all the notes from every chord as close as you can to one another. This gives your progression a very "open chords on a guitar" type of feel since that's pretty much how open chords work on a guitar, none of them seemingly higher or lower than the other, but all distinctively different. You could then use something like this too keep them all close to one another.


There are tons of ways to voice your chords together like this. None of them are wrong as long as you play the correct notes for each chord. Mastering this technique is essential if you want to feel in control of your music, being able to give it movement in any direction you desire. Just remember that any chord can be inverted in any which way you want, as long as the notes remain the same. Complex chords offer you even more ways to invert, twist and mangle your progressions, make sure to explore and have fun with them.

intervallic and single shot arps
There are two more ways in which chiptune arps are usually used. The first one, the intervallic arp is composed of only two notes. Being only two notes, it doe not form a complete chord. The most common of these is clearly the octave jump and it's been heard in thousands of songs. This is a simple two note arp that will have its second note placed at an interval of 12 semitones. This gives your instrument the classic "chip tune arp" flavour, but keeps it centered on a single note, thus making it possible to use it easily for melodies and solos. You can explore different intervals of course. Another common interval for example is the fifth (7 semitones).

Intervallic octave jump
Single shot, note the goto command.


The second method is the single shot arp. This is basically just about any arp that will play only once and then remain on the last note. Two commonly used arps for single shots are the two notes octave jump (12-0) and the three notes double octave jump (0-12-0). This gives your instrument a quick short burst of chiptune arp sound, but then stabilizes into a single tone. It is important to ensure that your arp does not loop when making a single shot arp instrument. In Klystrack you can either check the No Program Restart box at the top of the program editor, or you can manually make it go in an infinite loop that will not repeat the arp.

conclusion
So you see, there's a lot to do with arps. This by no means represents the be all end all guide to everything you can do with them, but it should get you well on your way. And hopefully, you learned something new today and got a bit more music theory in you at the same time. Now go, young grasshopper, and explore. There's nothing like trial and error.

08/03/2013

klystrack tutorial - config options

Some would say I should have started with this tutorial first, but some should learn to keep quiet about such things, 'tis what I say. No but seriously, I know it's a little late to deal with those but I figured most people would either have already done that, or they have gotten used to the way klystrack is set up by default.

While I know that Klystrack follows much of the modern tracker standards, I'm an old man and I was raised around coal-powered computers. Because of that, I just couldn't deal with a lot of the default configuration. I will not go over every single option in the menus and all the things you can do to customize Klystrack to suit your own needs, but I will go over those that might be ambiguous as well as show you how I personally have it set up. 

preferences
Now, if you click the shiny Menu button, or right-click anywhere in the software you will bring up the menu bar. If you wonder why it's on the right click, then you probably were not born in the Amiga days. Do yourself a favor and get into the Amiga. Right meow. AMIGA FTW.

Ok partisan bullshit aside, once you have the menu bar displayed, you'll want to head to the Prefs menu. This is where the basic customization begins and we shall go over each options, or at least those I understand. 

Theme is where you select what Klystrack looks like. For this series of tutorials, all screenshot were taken under the Blacklyst theme because those colors fit best with the colors of my blog, but normally when I'm composing I favor the Golden Brown theme. This is just a matter of personal preference of course but I find that Golden Brown and Blacklyst offer you the best clarity and are not too aggressive on the eyes.

Keymap is where you select how certain functions are mapped to the keyboard. By default, you'll have a choice beween Default for those used to modern trackers, AZERTY for some of our European friends and FT2 which basically just adds changing channels with the TAB key to the default layout. There is a way to configure your own personalized keymap but I will come back to that later as I go over my own custom layout.

Pixel Size will change the display size basically. Klystrack was meant to feel and look oldschool and to be able to adapt to a variety of screen resolutions. On most modern computers (and by modern I mean, built after the cold war) you will probably want to use 2x2 pixel size. It will give you a "320x200" type of look which is exactly what tracking is all about. AMIGA FOR THE W--- sorry. You will probably find 1x1 too small, and 3x3/4x4 way the hell too huge. Again, personal choice...but everybody I know, their moms, and the various horses they rode in on all use 2x2 because it's what the cool cats do.

Full Screen is self explanatory enough. Suffice to say, I never work in full screen because I hate to alt-tab from a full screen program and since I use two screens, I don't want my mouse cursor be to locked to a single screen. I just maximize the window size on whatever screen I am using and it works just fine.

MIDI contains all the MIDI options. If you don't know what MIDI is, then you probably don't need it so skip ahead. If however you were planning on using it, well skip ahead anyways because it's kind of not working too great at the moment. As of this writing (v1.6.0 r1219) the MIDI support is quite buggy and can sadly not be used to do anything worthwhile. It hurts if you, like me, are using a 5000$ Nord Stage as a controller. Eighty-eight weighted keys of wasted potential....*cry*

Keyjazz is an option that you can only really appreciate in the Instrument Editor screen. At any moment, on any screen, using the letter keys on your keyboard will trigger notes, which is useful for jamming melodies on the fly, or testing out changes you make to an insutrment's settings. Normally each new note you trigger this way will cut whatever note was playing before. However, if you have Keyjazz turned on and you are in the Instrument Editor screen, then you will have polyphony. Each note will use a separate voice and you'll be able to hear chords. I am sure there's a limit to the number of notes that can be played simultaneously but whatever it is, it's high enough that you probably don't need to worry about running out. If you are dealing with infinite sustain instruments, this option will kind of get in your way because notes will not fade out or be cut by new ones. In such cases, press the spacebar to stop all sounds.

Follow Song Position will make your patterns scroll across the screen when you press play. I have no idea why anyone would want this off as it's confusing as all hell, but if you have masochist tendencies, give it a try. Otherwise be sane, and leave it on.

Animate Cursor will make your edit cursor glide from one place to another. For example pressing Enter when you are in the pattern editor will transport you to the sequence editor. With this option on, you will see the cursor move from one place to the other. With the option off, the cursor will jump right to its destination.

Hide Zeroes will simply hide all the pattern effect data that is empty (0000). Oldschool trackers used to always display the zeroes, but everything looks so much cleaner when you are not shown this pointless information. I recommend turning this on at all times.

Protracker Style Delete is one of the most useful option that is strangely not turned on by default. When it's turned on and you are editing a pattern, pressing the delete key will simply delete whatever data there is at your edit cursor's position as if it was entering an "empty note". If it's turned off, it will delete whatever data is at your edit cursor's position, and move everything that is underneath one row up. This will mess up your pattern big time, especially if you're just punching in data. I strongly suggest you turn this on, leave it on, and go around town to convince all the neighbors to also have it on at all times.

Toggle Edit On Stop is my fault. I kind of told the dev that some weirdos, like me, prefer to use the spacebar to stop the song instead of reaching way the hell up to the F8 key. But since the spacebar is also the key to toggle edit mode on and off, it used to do both. Stop the song, and toggle the edit. This drove me nuts and I suggested to Kometbomb that the edit toggle should be an option. So there it is now. The way it works now is simple, but apparently complicated to explain. With the option off, pressing Play will turn off the edit mode while the song plays. If you then press the spacebar, then the song will stop without turning the edit mode back on. You will have to press the spacebar one more time to toggle editing. When the option is turned on, then pressing the spacebar while the song plays will stop the song and also toggle the edit both right back on.

Center Pattern Editor is a mystery to me. I can't tell what it does, whether it's turned on or off. If you figure it out, feel free to point at me and laugh.

Decimal Numbers is for people like me who can barely manage hexadecimal without breaking a limb. It won't change everything to decimal as a lot of tracker functions are based around hexadecimal, but it will at least make the position row of every pattern display in decimal, as well as the position indicator in the sequence editor. I always have it on because that's what I am used to and it enables me to quickly locate the quarter-pattern position (16), the half point (32) and the three-quarters point (48) in my 64 row patterns. This is a personal setting, but years of counting beats in normal-people number left me unable to use hexadecimal for this.

Default Pattern Length has two settings, a toggle option called Same as Step and a selection of four default pattern lengths. As stated in my first tutorial, I recommend using 64 row patterns all the time. Unless you need shorter patterns for different time signatures, there is almost no reason to use other lengths. If you have the Same as Step option toggled on, then at any time in your editing, if you change the Step setting on the main screen, the next pattern you create will be create at that length. So for the best of both worlds I recommend putting Same as Step to on, and setting the default size to 64. What this will do is set up Klystrack to 64 row patterns by default all the time, with the option of changing it on-the-fly with the Step setting. Remember to set your Step back to 40 (64 rows) when you're done though.

Reverb Length in Ticks is the option you toggle if you want the delay taps in the FX section to be displayed in ticks instead of milliseconds. I use milliseconds because it's how I learned to use time-based effects, but I realize ticks might be more appropriate for some people. Your call, it doesn't affect anything except the display of the data.

AHX Style Sequence Edit is another useful option is strangely turned off by default. This option affects how pattern numbers are entered in the Sequence Editor. When the option is off, a single key is all that is needed to enter a pattern number. For example keys 0-9 and A-F will enter pattern numbers 00 to 0F. To enter patterns numbers above that, stick to the alphabet. G will input 10, H is 11 and so on. This is a quicker method of entering the pattern numbers but it breaks when you reach pattern 23, entered with the Z key. If you want to use patterns above that you'll have no more keys to enter the numbers. Oh noes! This is where AHX Style Sequence Edit comes in handy. Instead of having a single key to enter a pattern number, you will only have to use keys 0-9 and A-F but you will need to enter both digits manually in the sequence editor. To punch in pattern number 53 for example, you need to put a 5 in the first column, and a 3 in the second. A little more time consuming, but infinitely more practical. If you're anything like me, breaking past pattern 23 happens on every single song so there's no point in ever having this option off.

Disable Nostalgy will simple disable the "decrunching" visual effect visible when you first start Klystrack. Granted it's only three seconds of your time, and yes the first time I saw it I smiled and nodded in approval. But by now it's lost its novelty effect and I just turn it off because I want to get to the music right away.

keymaps
You can edit your own keymaps and store them in a simple text file with the extension .key in the KEY folder. What this file does is not define a keyboard layout, it remaps the default keys to new places. So for example if you want your Play key (default F5) to be the Z key, you will have to create a line like this in the .key file:

K_Z = K_F5

This means that KEY Z is now replacing KEY F5. Now, what about keys that use modifiers such as shift, ctrl or alt? Let's say you want to remap the Play (F5) function to left-ctrl-w for some obscure reason. Then the line you need to input is:

M_LCTRL K_W = K_F5

Additionally, you can define keys according to what screen you're on, or what section of a screen your on. You do this by indicating the place where the key remapping is to take effect. If you like to use the TAB key to move your edit cursor to the next channel (default is ctrl-right) for example, you need these two lines:

[pattern]
K_TAB = M_CTRL K_RIGHT

The sections which are available to you are as follows:

[global] for keys that work in every screen.
[pattern] for when you're in the pattern editor
[sequence] for when you're in the sequence editor
[screenname] for keys to be mapped only in a certain screen, like instrument, or wave.

Lines that start with a # are not processed and can be used to leave notes in the text file for ulterior reference. For a list of all the valid key definitions you can use to edit your own keymap, please consult this link.

Now here's a copy of my own keymap, annotated with the reasons why I put these keys in these places.

# n00bstar's convoluted keymap
# inspired by protracker and fasttracker
[global]
#play/stop
K_RALT = M_SHIFT K_F6
K_RCTRL = K_F6
M_LALT K_RCTRL = K_F5
Nowadays it's common to have the F5-F8 keys used for such functions as play/stop, but for me these functions will forever be associated with alt and ctrl. Why? Well because that's the way Protracker set up the standard years ago, and even when I switched over to Fast Tracker 2 later on, these keys were still the default. To me they are a natural choice because since you will be using the arrows keys a whole damn lot while composing, your thumb will naturally rests above the ctrl key, making it an obvious choice for the Play From Cursor function, which plays the song starting at the beginning of the pattern you're at. If I want to loop the current pattern I'm editing, then its the alt key, just a centimeter or two away. And when I want to play the song from the top, I use left-alt + right-ctrl. It might seem awkward at first, but when you get used to it its really much more comfortable.

#windows
K_F2 = M_SHIFT K_F4
K_F4 = M_SHIFT K_F3
K_F5 = K_F2
K_F6 = K_F4
K_F7 = M_SHIFT K_F2
Since I got rid of all the play functions associated with the F keys, I remapped them so I can access every editor screen with out having to use the shift key. F2 is my main editor, F3 is the instruments (as it is by default), F4 opens the FX editor, F5 opens the full screen pattern editor, F6 is the full screen sequence editor and finally F7 is the wave editor. No more shift key for this fella, no sir.

[pattern]
#tab move
M_LSHIFT K_TAB = M_CTRL K_LEFT
K_TAB = M_CTRL K_RIGHT
[sequence]
#tab move
M_LSHIFT K_TAB = K_LEFT
K_TAB = K_RIGHT
Again, this is an old Protracker/FastTracker standard. I like to be able to use the TAB key to move a full channel to the right, and Shift-TAB to move a full channel to the left in both my pattern editor, and sequence editor.

mix rate and buffer
In your Documents and Settings folder (well.. at least in Windows, I wouldn't know for Macs because I don't use Macs because they suck and if you disagree then you are retarded and deserve death) you will find a file called .klystrack. This is a standard text file you can edit in Notepad and you will notice it contains pretty much all of the options we've just went over and what they're set to. There is however two extra lines in that file which you cannot configure from the software itself, the mix rate and the mix buffer. 

The mix rate is the default sample rate at which Klystrack will be mixing its sounds at. By default it is set to 44100, which gives you a resolution of 44.1khz, the "CD quality" standard. There are no real reasons to go above or below this sample rate and there's even a fair chance of making Klystrack crash if you set it at nonsensical numbers. But you know, if you want to play around with it...there it is.

The second line is the mix buffer. By default this is set to 2048 samples, which means that every sound that Klystrack makes is delayed by 2048 samples before being actually output to the speaker. The default value is just fine and you should not feel too much of a delay between then moment when you press a key and the moment when the sound is played. I use 1024 because years of using professional equipment and ASIO drivers have made me very sensitive to latency. Anything lower than that, you risk running into overheads, which will translate if aggressive glitches in your output. This is however very dependent on the computer you are using so feel free to experiment. The worst that can happen is your computer will explode and you will die a horrible fiery death.

favorites
Every time you use the file requester in Klystrack, you will notice a little heart icon that is grayed out. If you click it, it will light up, marking the current folder you're in as a favorite. You can then press the favorite button at the bottom of the file requester to recall a list of all your favorite folders. If you're an organization whore like me and you've got everything neatly stored in 800 carefully named folders, this will make your life much easier. These folders are saved in the .klystrackfavorites file located in your Documents and Settings folder (again... fuck you Mac users nobody cares about you, you fucking hipster).

There it is folks. Next time I promise we'll get into fun stuff. No more of that user-manual crap!

07/03/2013

klystrack tutorial - fx section

In this third tutorial, we'll take a quick look at the FX section. I say quick, because it is a relatively small section and it shouldn't take much time to explore and describe what each setting does. The FX section has one global effect called the Multiplex and four separate inserts (hereafter called simply unit)  that each have the same three effects, in the same static signal path

What's an insert? The name simply means that the effect unit is inserted between the sound source and the output. Think of a distortion pedal for a guitar. You insert it between the source (guitar) and the output (amplifier). There are other ways to apply effects to a sound (send/returns, mid/side, dark sorcery, etc) but Klystrack only uses inserts, meaning that when you send an instrument into an effect unit, you will have very little control over the dry (original sound) and wet (effected sound) balance.

What's a signal path? As the name says, it's the path that the sound will take through multiple effects. Let's make another guitar analogy. Let's say you have three pedals, distortion, chorus, and delay. The order in which you plug in these pedals together is your signal path. If you plug them Guitar > Delay > Chorus > Distortion, then your effects will be applied to the sound of everything prior to it. The delay would process the guitar sound as you'd expect it. Then the chorus will process all of that, delay taps included. And last, the distortion will process all of that once more, distorting the chorused and delayed guitar which should technically ruin everything you're trying to accomplish and should serve lesson to always put the distortion first in the chain. 

For each of the four FX units, Klystrack uses a fixed signal chain which goes Chorus > Delay > Crusher. In the software, these are called Stereo, Reverb and Crusher respectively, but I can't bring myself to call the first two that way. It's like calling a pixel "an image-dot" or calling a car "a moving people box". Let's call a dog a dog and use the proper terms for these effects shall we? We shall. Right then, moving on...

multiplexer
We'll start with the weirdest effect, because...reasons. What the multiplexer does is basically cycle through each of your channels one by one, playing the sound of the one it's on for a specific number of ticks while muting the others. Sounds confusing? Read on, it gets easier.

The multiplexer, also known as the what-the-hell-is-going-on effect.
Period is the number of ticks that each channel will play for. So for example let's say you have a song with four channels, running a speed 06 (6 ticks per row) with the multiplexer's Period set to 3. When you press play, the first row (00) will play only what's in channel 0 for the first three ticks, then only what's in channel 1 for the last three. On the second row, it will play channel 2 for three ticks, then channel 3 for three ticks and then this restarts from channel 0 on the next row and so on and so forth. Since this value is expressed in ticks, the lower the number, the faster the multiplexer will cycle through your channels.

Inaccuracy is a setting that will mess with the pitch of each note played in the song. Values range from 00 to 12. What it seems to do is grossly quantize the pitch of your notes. For example at it's highest setting, it really doesn't matter what note the multiplexer encounters, it will always play the same. At a slightly lower setting, it will group C,D, and E together at the same pitch, then F, G, A to another etc. All of these pitches are approximated and often discordant and this just as it was intended, the multiplexer is meant for glitchy experimental music.

crusher
The crusher is an effect that performs three functions. The first is bit crushing (hence the name) which reduces the bit depth of your sound. The second function is downsampling which reduces the sample rate of your sound. And the last function is a dither which smooths out the overall result of this effect. 

Ze bit crusher. Used to crush bits, should bits require to be crushed.
BITS is the number of bits by which to reduce. The bit depth of a sound is the "vertical" resolution of a digital sample. If you look at a waveform, you will see three lines. The one in the middle is 0, and the top and bottom lines represent the maximum bit resolution you have. The higher the bit depth, the more vertical "slices" you have between 0 and the top/bottom values. Remember that this is binary, not decimal, so for example 2 bits can express 4 numbers (00, 01, 10, 11) which would translate in a +2/-2 range for a waveform: two above zero and two below. This grows exponentially as you add bits. At 16 bits, you have a range of 65536 possible numbers, effectively giving you a range of +32,767/-32,768. The more you crush the bit depth, the lower the quality of the sound, and the closer to a pure digital square wave (1bit) you get. Since you are losing vertical resolution, you are also losing the ability to ramp up smoothly in volume so things like the volume envelope will start breaking up as you increase the BITS value. This effect can, in some ways, be used to create distortion effects or make some instruments sound more noisy.

DSMP is the downsampler. Values range from 00 to 64 and the higher you go the lower your sample rate gets. If the bit rate is the vertical resolution, then the sample rate is the horizontal resolution of a digital sound. Put (very) simply, the higher the sample rate, the more horizontal "slices" can be played per second. In rough not-too-technical terms, this means you can play higher frequencies more accurately. By downsampling a sound, you are effectively reducing the number of samples per second and thus, your ability to have proper high frequencies in your sound. On simple waveforms like you get from the synth's oscillators, this effect will give a lo-fi quality to your instruments. Be careful though, as you will quickly lose the ability to play high notes as you increase the DSMP value. Used creatively, when the sample rate syncs up with the frequency of your note, this can create pleasing "bell" sounds, or give nice tremolo effects.

Dither is the application of noise patterns to smooth out gross quantization. This permits a signal to be of relatively low quality, but still retain parts of its original character and sound. In Klystrack, the dither is very crude so do not expect it to make a crushed/downsampled instrument sound like the original signal, but it can be used to smooth out the effect if it gets too rough. It will introduce a sort of noise to your signal, which is very interesting when you want to achieve a certain lo-fi quality, which I assume is what you're going to be using the crusher for in most cases anyways.

The Volume is used to keep sounds in check. As explained before, reducing the bit depth of a sound has a tendency to increase the volume. This setting is basically just an adjustment to bring back a rogue sound at more manageable levels so you are able to mix it with the rest of the song without having to boost everything else in the stratosphere. 

chorus
A chorus is a time, and pitch-based effect that basically makes a copy of your sound and delays it a bit from the original while applying slight pitch variations. Klystrack's chorus is a little different from most chorus effects in that it uses the same settings for both the time delay, and the pitch modulation. While this is less flexible than a standard chorus, in most cases it will do just fines as very rarely will you want to drown your sound in thick chorus, and if you do you will probably want to go all out bat shit crazy anyways. 

It's called stereo, but it's really a chorus, dammit.
Now I don't know all the details on how this particular chorus was programmed, but what it seems to be doing is making a copy of the original sound, and applying the effect to both the copy and the original at opposite polarities. Meaning that when one of them is chorused at "+25ms" then the other one is chorused at "-25ms". I might be wrong, but since you lose the original signal entirely through this effect, I doubt that it would have been programmed to make two copies and then mute the original signal. But hey.. what do  I know?

Min/Max are two settings used to determine the minimum and maximum amount of delay that will be applied to the copy of your original sound. The chorus will oscillate between this two values according to the speed you set in Mod. Values here are in milliseconds, from 0.25ms to 25.5ms.  Note that these values are also used to determine by how much the pitch of the sound will be modulated.

Phase is the separation between channels (audio channels.. meaning left and right). Values go from 00 to 40, which essentially means from having the two signals dead center (mono) to having them completely separated left and right. Any value above 00 will give your sound increasingly bigger spatial placement. This can be very useful to separate two instruments that tend to muddy up each other in a mix. If two of your instruments are competing in frequencies and bury each other, try leaving one in mono, and then chorusing the other one into the hard left/right.

Mod is the speed, in hertz, at which your chorus will oscillate between the values set with Min/Max. Again, just to make sure the message came across, this affects both the delay and the pitch modulation of the effect. Also, this affects both the delay and pitch modulation. And always remember that it will affect both delay and pitch modulation.

delay
Yes, it's called reverb, I know. And technically speaking it is a reverb since its taps are only played once. But to achieve a realistic reverberation effect, you'd need a metric shit ton more taps than the 8 that are offered here. And yes, I know, it's not a delay either since the taps do not repeat according to signal feedback and bla bla bla. Point is, at the end of the day you will use this for delay effects about 99% of the time, so there. And while it is neither usable as a reverb, or definable as a delay, this effect offers you a lot of possibilities with the way it is set up. With this effect, you'll be able to create (very) short reverbs, delays that can be synced to the tempo of the song, chorus effects without pitch modulation and flangers. Think of time as a time-based effect factory.

The big box of taps. Used for tap-dancing, mostly.
Roomsize, Volume, Decay and Set are settings that you use to generate the time and volume of each tap automatically. Those settings do not go very high, and thus will tend to produce exactly what was intended with this effect: SNES-like reverbs. That is, short and quickly fading echoes. Roomsize will determine the time of each tap. The higher the value, the longer the time between taps. Volume will decide at which volume the first tap is while Decay will determine how fast they fade out. Once your setting are where you want them, press Set and they will be applied to the taps.

Spread is kind of like the chorus effect and will only affect the taps, not the original signal. Values go from 00 (mono) to FF (complete separation left and right). Just like the chorus, this can be used to push a sound outwards from the center of the mix, but unlike the chorus there is no pitch modulation applied here.

Editing the taps yourself however, is where this effect shines. There are two settings to each of the 8 taps available. The first is the time, which can be expressed either in milliseconds, in increments of 1ms, which is what people used to "real" effects might prefer to use. Or you can have it in ticks, in increments of 0.05 ticks which might be more up the alley of people who learned music in trackers. In both cases, the increments are the same, 1ms = 0.05 tick. The second setting is the volume which is expressed in how many decibels away this tap will be from the original signal's volume.

Take a look at the settings shown in the above image. Each tap is 100ms apart starting at 50, and each tap is -3db lower than the previous one. What that means is that 50 milliseconds after a sound is sent to the delay, the same sound will play again 3 decibels softer, and again at 150ms, this time 6 decibels softer than the original volume and so on until all 8 taps have player.

You will notice there's a button between each set of arrows for the time. In the image above, these are marked with 0, 1, 2, 2, 3, 4, 5, and 6. The number represented here is a rough approximation of how many pattern rows away from the original note this particular tap will play. You can press this button to set the timing exactly to that number of rows. For example if you want a tap to play precisely two rows after your note is triggered, then move the ms/tick setting until you see the number 2 on the button, then click the button. This will adjust the timing to precisely what it needs to be to hit at exactly 2 rows. Note that while the actual the timing for each tap is not affected by the song's speed, the number shown on this button will actually change to show you the number of rows it represents at the new speed. If you change your song's tempo mid-project, it would be a good idea to re-set your delays to fit the new tempo.

Similarly, there are two buttons next to the arrows for the decibel setting. -INF means minus infinity, which essentially means this tap is silent and will not be heard. The 0 button is the opposite and sets the tap's volume to a 0db reduction, meaning it will play at the same volume as the original.

For classic delays, pick a number of rows, and increase each tap by that same amount (1,2,3,4,5,6,7,8 or 2,4,6,8,10,12,14,16 or 3,5,9,12,15,18,21,24 for example). Make sure each new tap is played at a lower decibel value than the last and there you have it, a bread n butter type of delay. You can of course get much more creative with it, but since you have four separate FX units, it's always a good idea to have one generic delay on hand.

By using very low values for the times, you can also create flanger and chorus effects. Setting a single tap  to 1ms with a 0db reduction will essentially give you a second identical copy of your sound delay by a single millisecond, thickening its sound and changing its timbre. Play around, explore the values and you'll discover a ton of ways to change the timbre of your instruments this way. Be careful not to use values that are too high for the timing, otherwise you'll fall in reverb/delay territory. 

And so that's about it for the FX units do and what each setting is used for. Remember that nothing beats noodling around, so explore and have fun and you'll find that these effects extremely useful for the sound they open up, and the time they save. Hell, who wants to waste channels and time to edit echoes by hand in this day and age?

Stay tuned, next time we'll go over how to personalize the Klystrack settings to suit your needs. And after that, with all the technical details out of the way we'll finally get to dig in the fun stuff and make some actual music.