29/03/2013

klystrack tutorial - arpeggios

If there is one sound that defines what chip music is all about more than any other, it's the arpeggio. An arpeggio is simply a group of notes that are played one after the other. Now I know that sounds awfully generic a description, and that it could apply to any series of note, but there are a few things that make an arpeggio different from, let's say, a solo. 

what's an arpeggio?
The first defining element of an arpeggio (here after simply called arp because I'm lazy) is that it is a broken down chord which has its notes played one after the other. There are many ways to play these notes. You can play them in order from low to high, high to low, or mix those two modes and go up then down, or down then up. You can even have your own personalized order for those notes to play in. Since any three notes will form at least part of a chord, there really are almost no limitations to what notes you can use to form an arp.

The second defining element of an arp is that is it usually repeated more than once in order to establish the chord it is based on. This is not a requirement per se, but it is extremely common. Take for example that German dude's moonlight-related sonata-type diddy. What you hear at the beginning is an arp. It is a deconstructed Dm (D minor) chord with the notes being played repeatedly from lowest to highest.

An arp can also be spread across octaves by chaining the same sequence of notes at a higher or lower octave, creating longer arps with more movement to them. There are endless ways to be creative with arps since there are really not many rules holding the concept together. You could for example have a Dm arp that plays up the three notes in the middle octave once, then repeats the same notes in an up/down pattern an octave higher after that. 

The important thing to remember is that an arp is used to establish a chord without playing all the notes together at the same time. Other than that, you're pretty much free to go crazy with it. Some of the more classically trained individuals out there might argue, but fuck them.

the chip arp
The birthplace of the chiptune arpeggio is the Commodore 64 and its "invention" is usually credited to mega monster chip god Martin Galway with the score to Kong Strikes Back!. Since that old piece of crap (the C64, not Martin) had only three notes of polyphony, people found creative ways to cram more music in those measly three channels. 


On a piano, when you hold the sustain pedal and finger an arp, each new note rings with the others thus easily establishing the chord. On the C64 however, each new note would cut off the previous one. It would still establish the chord, but in a much weaker way when these notes were played slowly. 

The solution was speed. By playing arps incredibly fast, it gave the impression of all three notes being played simultaneously, but they still used up only one channel instead of three. It also had this very electronic texture to it, texture we all know and love now as one of the main chip music element. 

Another important element of chip arps is that it is also often used to establish intervals rather than chords by using less than three notes. More on that later.

how it works
Most chip music software use a system of 'ticks' to control its timing. A single tick being the smallest possible time element. A single row of a pattern is usually three to six ticks long depending on your project settings. Some software use a different timing system but the effect is virtually the same. 

When playing an chip arp, each note of the chord will be played for a set number of ticks. Since there are many of them per pattern row, it then becomes possible to play most, or all of a chord's arpeggiated notes on a single row. Typical settings for chip arps use 1 to 3 ticks per note. You can of course use more, but the more ticks per note, the slower the arp is. If played too slow, you start losing the distinctive chiptune sound and you enter the more traditional, classical arpeggio. In Klystrack, the speed of your arps is determined by the P. PRD setting in the instrument's program, which is essentially the number of ticks per note. 

There are two basic methods for creating arps for chip music. The first one is to include the arp's notes directly in the instrument, which is called a static arp. The second method, dynamic arps, decides which notes are part of the arp on the fly with pattern effects. Both methods have their pros and cons.

how to create static arps
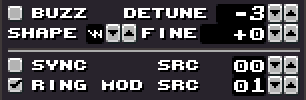
Basic saw wave settings.
Static arps are created by entering the arp data directly into an instrument. Their main advantages is that they can easily be used on any note thus transposing the entire chord to a new root, as well as not having to enter any pattern commands when using them, thus freeing up the pattern command column for something else like filter sweeps, portamentos and whatnot.

The main disadvantage is that for complex chord progressions with inverted chords, you tend to eat up a lot of instrument space quickly since you need an entire new instrument to make a different chord, or variation/inversion of a chord.

In the following example we'll create arps for the two most common chords in music, the major and the minor chords. Let's start with the major.

Start by selecting an empty instrument and going in the editor. Give the instrument a name, like "Major Arp" or "Monkey Ninja". You can select whatever you want in terms of oscillators and envelopes, but for the purpose of this example we will use a plain saw wave with everything else left to default settings.

A major chord, broken down.
The next step is to enter the actual chord recipe in the program editor. Since we're making a major chord arp first, we need to know exactly what are the notes for that chord. Fortunately, you're sitting in front of the internet right now so you shouldn't have too much trouble finding that information. A quick Google search will tell you that the intervals, in semi tones, for a major chord is 0 (the root), 4 (the third) and 7 (the fifth).

Now click the program editor and input these numbers on the last digit of each row. You will see that Klystrack will tell you what actual note this interval represents based on your instrument's base note. Since the default is C, you will get C, E and G in the program.

The last step is to make everything loop neatly. For that we will used the Goto command. This command has two components, the command itself, and the destination. For example FF00 will make the program jump back to row 00, and FF09 would make the program jump to row 09. Since we want this arp to repeat from the beginning each time, we will use FF00. This will make the program play the first three rows sequentially, then loop back to row 00. 

Playing a C note with this instrument will then give you a C major arp. Since chord triads always use the same intervals no matter where they start from, if you play a D note with this instrument you will get a D  major chord and so on. So from this point on, whenever you need a particular major chord in your song, you can use that instrument and just enter the root note of the chord you want to play and voila.

Same concept, but for a minor chord.
Now select a new instrument, and repeat the process for a minor chord. The only difference is that the minor chord uses a flattened (one semitone down) third. So if the major was 0-4-7, then the minor is simply 0-3-7.  Go ahead and input this in the program editor and you will get a minor arp. As with the previous instrument, whenever you need a minor chord, all you need to do is select your "Minor Arp" instrument and enter the root note of the chord you're looking for in the pattern. 

And there you have it. With these two instruments you should be able to easily recreate just about 90% of all the music in the last 50 years...really.

Now for your homework, go on the intertubes to find more triad recipes like these and just keep repeating the same basic process. There are quite a few other triads available, like augmented and diminished chords.

how to create dynamic arps
Dynamic arps have no fixed notes. The first note in the arp will be whatever note you enter in the pattern, and the other two are assigned on the fly during playback with pattern commands. The two main advantage of dynamic arps is that you only need to use up one instrument to create many types of chords, and they make it really easy to invert triads for better voicing.

The biggest disadvantage is that there is only two dynamic notes you can assign so in most cases you're limited to triads. You can go beyond triads but you will need to create new instruments for each variation. 

Notice the EXT notes.
Let's start from the same point as we did for static arps and create a new instrument from a basic saw wave, leaving everything else on default settings. Now instead of entering the specific intervals for each note of the chord, we will change the last two notes of the triad to floating notes that we can then change directly from the patterns. This is done with the 00F0 and 00F1 commands. Start by entering 0000 on the first row, which will be the note on which the arp starts from, and then enter 00F0 and 00F1 on the next two rows. You will notice that instead of actual notes being identified on the side, you get EXT0 and EXT1, which mean external data (patter commands) will be used to determine the note to play on that row of the program. As with the static arps, make sure to include an FF00 command at the end to make it loop neatly. 

So how do you use those? Well let's say you wanted to make this instrument play a C major chord. First start by entering a C note in your pattern, then move to the pattern command column next to that note and use the command 0047. Remember this 4-7 from the last example? This will use the note you just entered as starting point (row 00 of the program) and then play a 4 semitone interval for EXT1 (row 01) and a 7 semitone interval for EXT2 (row 02), essentially giving you the same results as the major static arp we created earlier. This makes it really easy for you to change the nature of the chord by simply entering new numbers in the pattern command column of your patterns.

C what I did there?
The example to the left shows you how to trigger different C arpeggios from a single instrument by simply changing the 00xx command. Since the first row of your instrument program (0000) will basically play the note you enter in the pattern, it's possible to transpose these chords anywhere you want just as you can with static arps. If you were to replace the C note in this example for F, then you'd effectively be playing F, Fm, Faug and Fdim. Note that once you enter a 00xx command in a channel, this command remains valid until it is replaced by another one. This means you do not need to enter the command every time you trigger a note. The arp will play whatever 00xx was last used in that channel.

Invertamaterized!
The other, and biggest advantage of dynamic arps is the possibility to easily invert chords for better voicing. In the example on the right, what you see are three different ways to play a C major arp. The first one is the traditional way to play the chord. It will start on a C, then play four semitones up (E), and then seven semitones up (G). 

The other two are simply inverted variations of the C chord. Take the G for example. Since it is accompanied by the numbers 5 and 9, the arp will start on a G, then play five semitones up (C), and then play 9 semitones up (E).  If you take one that starts on an E, you will see that it ends up playing E, G and then C. In all three cases the notes being played are the same, C-E-G, but in a different order. This is called inverting a chord and we'll get back to it a bit later.

fitting complex chords in triads
Complex chords are chords that use more than three notes. Obviously some aren't very complex, simply adding a fourth note to the mix, but it can quickly get out of hand, especially if you let a jazz fan near your piano. As a rule of thumb, you should always keep jazzmen out of your house. They will crash on your couch for weeks and eat all the damn food. They also smell vaguely of boiled cabbbage.

But still here you are with this nice chord progression you're trying to render with chiptune arps and the last chord of that progression is one of those pesky dom7th chords. How do you make a four note arp? Well the easy way out is obviously just to add another row to your program and enter the note there. Problem solved right?

Well yes and no. It's certainly a valid way of doing things and if this fits your particular needs then you're all done here. But it doesn't always sound right however. Since these arps are played really fast, adding an extra note in the sequence changes the texture of the "chip sound". You will find that four note arps do not sound as "fast" as three note arps simply because it takes a wee bit more time to loop back to the first note. 

Fortunately there's an easy-ish solution for fitting complex chords in three little notes. And yes, the solution is a stupid as you think it is: remove some notes. But won't that change the nature of the chord? In a way it will, and in a way it won't. Let's take one of the more common complex chord, the C dom7th, also called C7 for friends and family. This is primarily a C major chord, with an added flat 7th. In this case, the A#. So what we want to preserve even though we're removing notes is those three elements: we're playing a C, it's major, and it's got a flat 7th to it.

The easiest note to remove is almost always the root, C in this case. In most cases, this note is already being played somewhere else by another instrument, most likely the bass. So it's pretty safe to remove it since there are other tonal elements in the song supporting the fact that the chord is a C. You're left with E-G-A#. technically, this is an Edim chord. But as long as the rest of your song doesn't strongly suggest you are currently in E, and rather implies your're in C, then the overall texture of the song will be a C7. A major chord is also much stronger than a diminshed chord (which is really one of the weakest chords) so it doesn't take much to convince the listener you're in fact, playing a C.

The second easiest note you can remove from a chord is the dominant fifth, in this case, the G. The dominant's job is kind of to reinforce the root. If you remove the fifth, you're left with C-E-A#. These three notes together do not form another chord simply because there's not enough space between A# and C. So even if there's no G at all anywhere in the rest of your music, you're pretty much assured that the idea of the C7 is getting across just fine. And since the chord establishes itself without the help of other instrument, your bass line doesn't really need to establish the root and is free to wiggle about and do more interesting stuff.

The last note you can remove from that chord is the third, in this case the E. The third is really what gives your chord its minor or major character. If you remove it, you're left with a power chord (root + fifth). Since we're trying to preserve the original chord as much as possible, this note should be the last one you consider removing. But it can still be done. The remaining notes, C-G-A# still do not form a new chord because of the interval between A# and C being too small so in a way you still retain that C7 flavour, albeit without the major gravy on top. The moments when it's safe to remove the third from chord and keep that major tint to it is when the rest of your chord progression implies that this C chord would be major. So if you're in the key of C major, then removing the third can be done with relatively little impact on the chord itself.

So you could write a C7 arp (the static kind) by playing a C in the pattern, and have the instrument play either of those interval combination: 4-7-10, 0-4-10, and 0-7-10. You're left with a three note arp that won't sound too different from your basic triads in terms of texture and speed.

For even more complex chords, five notes and up, fitting them into a three note arp can be a little more challenging. You will need to look at what else is playing in your song that will imply that the notes you remove are still somehow being played. This can be as direct as having another instrument playing that note, to something as subtle as having your chord progression imply the missing information is still there. Fun times ahead.

voicing your arps
Chords can be inverted. What that means is that it doesn't really matter on which note you start, as long as you play all the correct notes, your chord will come across. They don't even need to be next to one another, you can spread them across the octaves if you want. Of course too much distance between the notes will sound a bit meh, but it will still technically be the correct chord.

I'm a god damn comedian.
Let's take the C major chord, again, as example. The natural chord is played C, then E, then G. From lowest to highest note. If you take your C note and put it an octave higher instead, you still get a C major chord, but this time it starts on a G, and ends on a C, giving it a different flavour while still remaining a C major. This is called the first inversion. Now start from that, and move the E an octave higher. Still a C major chord since it's all the same notes again, but this time you're in second inversion. With this technique, it's possible to shift your chords up or down in pitch while keeping the chord intact. 

It's when you start applying this to chord progressions that you really start to understand what voicing is all about. Let's take an easy chord progression and play with it a bit. We'll start from the classic 1-4-5 progression in C major. This progression is simply three major chords one after the other: C major, F major, and G major. This is how you'd play the progression using only natural shapes.


While this works just fine. There's no escaping the fact that the progression keeps going up in pitch. It also sounds quite elementary, a bit as if you'd be playing something out of your first few lessons of piano. What if we'd rather have a descending pitch for this progression instead? Well in that case we could do something like this instead.

Same basic chord progression, but now with a descending pitch. Another way to play the same progression would be keeping all the notes from every chord as close as you can to one another. This gives your progression a very "open chords on a guitar" type of feel since that's pretty much how open chords work on a guitar, none of them seemingly higher or lower than the other, but all distinctively different. You could then use something like this too keep them all close to one another.


There are tons of ways to voice your chords together like this. None of them are wrong as long as you play the correct notes for each chord. Mastering this technique is essential if you want to feel in control of your music, being able to give it movement in any direction you desire. Just remember that any chord can be inverted in any which way you want, as long as the notes remain the same. Complex chords offer you even more ways to invert, twist and mangle your progressions, make sure to explore and have fun with them.

intervallic and single shot arps
There are two more ways in which chiptune arps are usually used. The first one, the intervallic arp is composed of only two notes. Being only two notes, it doe not form a complete chord. The most common of these is clearly the octave jump and it's been heard in thousands of songs. This is a simple two note arp that will have its second note placed at an interval of 12 semitones. This gives your instrument the classic "chip tune arp" flavour, but keeps it centered on a single note, thus making it possible to use it easily for melodies and solos. You can explore different intervals of course. Another common interval for example is the fifth (7 semitones).

Intervallic octave jump
Single shot, note the goto command.


The second method is the single shot arp. This is basically just about any arp that will play only once and then remain on the last note. Two commonly used arps for single shots are the two notes octave jump (12-0) and the three notes double octave jump (0-12-0). This gives your instrument a quick short burst of chiptune arp sound, but then stabilizes into a single tone. It is important to ensure that your arp does not loop when making a single shot arp instrument. In Klystrack you can either check the No Program Restart box at the top of the program editor, or you can manually make it go in an infinite loop that will not repeat the arp.

conclusion
So you see, there's a lot to do with arps. This by no means represents the be all end all guide to everything you can do with them, but it should get you well on your way. And hopefully, you learned something new today and got a bit more music theory in you at the same time. Now go, young grasshopper, and explore. There's nothing like trial and error.

08/03/2013

klystrack tutorial - config options

Some would say I should have started with this tutorial first, but some should learn to keep quiet about such things, 'tis what I say. No but seriously, I know it's a little late to deal with those but I figured most people would either have already done that, or they have gotten used to the way klystrack is set up by default.

While I know that Klystrack follows much of the modern tracker standards, I'm an old man and I was raised around coal-powered computers. Because of that, I just couldn't deal with a lot of the default configuration. I will not go over every single option in the menus and all the things you can do to customize Klystrack to suit your own needs, but I will go over those that might be ambiguous as well as show you how I personally have it set up. 

preferences
Now, if you click the shiny Menu button, or right-click anywhere in the software you will bring up the menu bar. If you wonder why it's on the right click, then you probably were not born in the Amiga days. Do yourself a favor and get into the Amiga. Right meow. AMIGA FTW.

Ok partisan bullshit aside, once you have the menu bar displayed, you'll want to head to the Prefs menu. This is where the basic customization begins and we shall go over each options, or at least those I understand. 

Theme is where you select what Klystrack looks like. For this series of tutorials, all screenshot were taken under the Blacklyst theme because those colors fit best with the colors of my blog, but normally when I'm composing I favor the Golden Brown theme. This is just a matter of personal preference of course but I find that Golden Brown and Blacklyst offer you the best clarity and are not too aggressive on the eyes.

Keymap is where you select how certain functions are mapped to the keyboard. By default, you'll have a choice beween Default for those used to modern trackers, AZERTY for some of our European friends and FT2 which basically just adds changing channels with the TAB key to the default layout. There is a way to configure your own personalized keymap but I will come back to that later as I go over my own custom layout.

Pixel Size will change the display size basically. Klystrack was meant to feel and look oldschool and to be able to adapt to a variety of screen resolutions. On most modern computers (and by modern I mean, built after the cold war) you will probably want to use 2x2 pixel size. It will give you a "320x200" type of look which is exactly what tracking is all about. AMIGA FOR THE W--- sorry. You will probably find 1x1 too small, and 3x3/4x4 way the hell too huge. Again, personal choice...but everybody I know, their moms, and the various horses they rode in on all use 2x2 because it's what the cool cats do.

Full Screen is self explanatory enough. Suffice to say, I never work in full screen because I hate to alt-tab from a full screen program and since I use two screens, I don't want my mouse cursor be to locked to a single screen. I just maximize the window size on whatever screen I am using and it works just fine.

MIDI contains all the MIDI options. If you don't know what MIDI is, then you probably don't need it so skip ahead. If however you were planning on using it, well skip ahead anyways because it's kind of not working too great at the moment. As of this writing (v1.6.0 r1219) the MIDI support is quite buggy and can sadly not be used to do anything worthwhile. It hurts if you, like me, are using a 5000$ Nord Stage as a controller. Eighty-eight weighted keys of wasted potential....*cry*

Keyjazz is an option that you can only really appreciate in the Instrument Editor screen. At any moment, on any screen, using the letter keys on your keyboard will trigger notes, which is useful for jamming melodies on the fly, or testing out changes you make to an insutrment's settings. Normally each new note you trigger this way will cut whatever note was playing before. However, if you have Keyjazz turned on and you are in the Instrument Editor screen, then you will have polyphony. Each note will use a separate voice and you'll be able to hear chords. I am sure there's a limit to the number of notes that can be played simultaneously but whatever it is, it's high enough that you probably don't need to worry about running out. If you are dealing with infinite sustain instruments, this option will kind of get in your way because notes will not fade out or be cut by new ones. In such cases, press the spacebar to stop all sounds.

Follow Song Position will make your patterns scroll across the screen when you press play. I have no idea why anyone would want this off as it's confusing as all hell, but if you have masochist tendencies, give it a try. Otherwise be sane, and leave it on.

Animate Cursor will make your edit cursor glide from one place to another. For example pressing Enter when you are in the pattern editor will transport you to the sequence editor. With this option on, you will see the cursor move from one place to the other. With the option off, the cursor will jump right to its destination.

Hide Zeroes will simply hide all the pattern effect data that is empty (0000). Oldschool trackers used to always display the zeroes, but everything looks so much cleaner when you are not shown this pointless information. I recommend turning this on at all times.

Protracker Style Delete is one of the most useful option that is strangely not turned on by default. When it's turned on and you are editing a pattern, pressing the delete key will simply delete whatever data there is at your edit cursor's position as if it was entering an "empty note". If it's turned off, it will delete whatever data is at your edit cursor's position, and move everything that is underneath one row up. This will mess up your pattern big time, especially if you're just punching in data. I strongly suggest you turn this on, leave it on, and go around town to convince all the neighbors to also have it on at all times.

Toggle Edit On Stop is my fault. I kind of told the dev that some weirdos, like me, prefer to use the spacebar to stop the song instead of reaching way the hell up to the F8 key. But since the spacebar is also the key to toggle edit mode on and off, it used to do both. Stop the song, and toggle the edit. This drove me nuts and I suggested to Kometbomb that the edit toggle should be an option. So there it is now. The way it works now is simple, but apparently complicated to explain. With the option off, pressing Play will turn off the edit mode while the song plays. If you then press the spacebar, then the song will stop without turning the edit mode back on. You will have to press the spacebar one more time to toggle editing. When the option is turned on, then pressing the spacebar while the song plays will stop the song and also toggle the edit both right back on.

Center Pattern Editor is a mystery to me. I can't tell what it does, whether it's turned on or off. If you figure it out, feel free to point at me and laugh.

Decimal Numbers is for people like me who can barely manage hexadecimal without breaking a limb. It won't change everything to decimal as a lot of tracker functions are based around hexadecimal, but it will at least make the position row of every pattern display in decimal, as well as the position indicator in the sequence editor. I always have it on because that's what I am used to and it enables me to quickly locate the quarter-pattern position (16), the half point (32) and the three-quarters point (48) in my 64 row patterns. This is a personal setting, but years of counting beats in normal-people number left me unable to use hexadecimal for this.

Default Pattern Length has two settings, a toggle option called Same as Step and a selection of four default pattern lengths. As stated in my first tutorial, I recommend using 64 row patterns all the time. Unless you need shorter patterns for different time signatures, there is almost no reason to use other lengths. If you have the Same as Step option toggled on, then at any time in your editing, if you change the Step setting on the main screen, the next pattern you create will be create at that length. So for the best of both worlds I recommend putting Same as Step to on, and setting the default size to 64. What this will do is set up Klystrack to 64 row patterns by default all the time, with the option of changing it on-the-fly with the Step setting. Remember to set your Step back to 40 (64 rows) when you're done though.

Reverb Length in Ticks is the option you toggle if you want the delay taps in the FX section to be displayed in ticks instead of milliseconds. I use milliseconds because it's how I learned to use time-based effects, but I realize ticks might be more appropriate for some people. Your call, it doesn't affect anything except the display of the data.

AHX Style Sequence Edit is another useful option is strangely turned off by default. This option affects how pattern numbers are entered in the Sequence Editor. When the option is off, a single key is all that is needed to enter a pattern number. For example keys 0-9 and A-F will enter pattern numbers 00 to 0F. To enter patterns numbers above that, stick to the alphabet. G will input 10, H is 11 and so on. This is a quicker method of entering the pattern numbers but it breaks when you reach pattern 23, entered with the Z key. If you want to use patterns above that you'll have no more keys to enter the numbers. Oh noes! This is where AHX Style Sequence Edit comes in handy. Instead of having a single key to enter a pattern number, you will only have to use keys 0-9 and A-F but you will need to enter both digits manually in the sequence editor. To punch in pattern number 53 for example, you need to put a 5 in the first column, and a 3 in the second. A little more time consuming, but infinitely more practical. If you're anything like me, breaking past pattern 23 happens on every single song so there's no point in ever having this option off.

Disable Nostalgy will simple disable the "decrunching" visual effect visible when you first start Klystrack. Granted it's only three seconds of your time, and yes the first time I saw it I smiled and nodded in approval. But by now it's lost its novelty effect and I just turn it off because I want to get to the music right away.

keymaps
You can edit your own keymaps and store them in a simple text file with the extension .key in the KEY folder. What this file does is not define a keyboard layout, it remaps the default keys to new places. So for example if you want your Play key (default F5) to be the Z key, you will have to create a line like this in the .key file:

K_Z = K_F5

This means that KEY Z is now replacing KEY F5. Now, what about keys that use modifiers such as shift, ctrl or alt? Let's say you want to remap the Play (F5) function to left-ctrl-w for some obscure reason. Then the line you need to input is:

M_LCTRL K_W = K_F5

Additionally, you can define keys according to what screen you're on, or what section of a screen your on. You do this by indicating the place where the key remapping is to take effect. If you like to use the TAB key to move your edit cursor to the next channel (default is ctrl-right) for example, you need these two lines:

[pattern]
K_TAB = M_CTRL K_RIGHT

The sections which are available to you are as follows:

[global] for keys that work in every screen.
[pattern] for when you're in the pattern editor
[sequence] for when you're in the sequence editor
[screenname] for keys to be mapped only in a certain screen, like instrument, or wave.

Lines that start with a # are not processed and can be used to leave notes in the text file for ulterior reference. For a list of all the valid key definitions you can use to edit your own keymap, please consult this link.

Now here's a copy of my own keymap, annotated with the reasons why I put these keys in these places.

# n00bstar's convoluted keymap
# inspired by protracker and fasttracker
[global]
#play/stop
K_RALT = M_SHIFT K_F6
K_RCTRL = K_F6
M_LALT K_RCTRL = K_F5
Nowadays it's common to have the F5-F8 keys used for such functions as play/stop, but for me these functions will forever be associated with alt and ctrl. Why? Well because that's the way Protracker set up the standard years ago, and even when I switched over to Fast Tracker 2 later on, these keys were still the default. To me they are a natural choice because since you will be using the arrows keys a whole damn lot while composing, your thumb will naturally rests above the ctrl key, making it an obvious choice for the Play From Cursor function, which plays the song starting at the beginning of the pattern you're at. If I want to loop the current pattern I'm editing, then its the alt key, just a centimeter or two away. And when I want to play the song from the top, I use left-alt + right-ctrl. It might seem awkward at first, but when you get used to it its really much more comfortable.

#windows
K_F2 = M_SHIFT K_F4
K_F4 = M_SHIFT K_F3
K_F5 = K_F2
K_F6 = K_F4
K_F7 = M_SHIFT K_F2
Since I got rid of all the play functions associated with the F keys, I remapped them so I can access every editor screen with out having to use the shift key. F2 is my main editor, F3 is the instruments (as it is by default), F4 opens the FX editor, F5 opens the full screen pattern editor, F6 is the full screen sequence editor and finally F7 is the wave editor. No more shift key for this fella, no sir.

[pattern]
#tab move
M_LSHIFT K_TAB = M_CTRL K_LEFT
K_TAB = M_CTRL K_RIGHT
[sequence]
#tab move
M_LSHIFT K_TAB = K_LEFT
K_TAB = K_RIGHT
Again, this is an old Protracker/FastTracker standard. I like to be able to use the TAB key to move a full channel to the right, and Shift-TAB to move a full channel to the left in both my pattern editor, and sequence editor.

mix rate and buffer
In your Documents and Settings folder (well.. at least in Windows, I wouldn't know for Macs because I don't use Macs because they suck and if you disagree then you are retarded and deserve death) you will find a file called .klystrack. This is a standard text file you can edit in Notepad and you will notice it contains pretty much all of the options we've just went over and what they're set to. There is however two extra lines in that file which you cannot configure from the software itself, the mix rate and the mix buffer. 

The mix rate is the default sample rate at which Klystrack will be mixing its sounds at. By default it is set to 44100, which gives you a resolution of 44.1khz, the "CD quality" standard. There are no real reasons to go above or below this sample rate and there's even a fair chance of making Klystrack crash if you set it at nonsensical numbers. But you know, if you want to play around with it...there it is.

The second line is the mix buffer. By default this is set to 2048 samples, which means that every sound that Klystrack makes is delayed by 2048 samples before being actually output to the speaker. The default value is just fine and you should not feel too much of a delay between then moment when you press a key and the moment when the sound is played. I use 1024 because years of using professional equipment and ASIO drivers have made me very sensitive to latency. Anything lower than that, you risk running into overheads, which will translate if aggressive glitches in your output. This is however very dependent on the computer you are using so feel free to experiment. The worst that can happen is your computer will explode and you will die a horrible fiery death.

favorites
Every time you use the file requester in Klystrack, you will notice a little heart icon that is grayed out. If you click it, it will light up, marking the current folder you're in as a favorite. You can then press the favorite button at the bottom of the file requester to recall a list of all your favorite folders. If you're an organization whore like me and you've got everything neatly stored in 800 carefully named folders, this will make your life much easier. These folders are saved in the .klystrackfavorites file located in your Documents and Settings folder (again... fuck you Mac users nobody cares about you, you fucking hipster).

There it is folks. Next time I promise we'll get into fun stuff. No more of that user-manual crap!

07/03/2013

klystrack tutorial - fx section

In this third tutorial, we'll take a quick look at the FX section. I say quick, because it is a relatively small section and it shouldn't take much time to explore and describe what each setting does. The FX section has one global effect called the Multiplex and four separate inserts (hereafter called simply unit)  that each have the same three effects, in the same static signal path

What's an insert? The name simply means that the effect unit is inserted between the sound source and the output. Think of a distortion pedal for a guitar. You insert it between the source (guitar) and the output (amplifier). There are other ways to apply effects to a sound (send/returns, mid/side, dark sorcery, etc) but Klystrack only uses inserts, meaning that when you send an instrument into an effect unit, you will have very little control over the dry (original sound) and wet (effected sound) balance.

What's a signal path? As the name says, it's the path that the sound will take through multiple effects. Let's make another guitar analogy. Let's say you have three pedals, distortion, chorus, and delay. The order in which you plug in these pedals together is your signal path. If you plug them Guitar > Delay > Chorus > Distortion, then your effects will be applied to the sound of everything prior to it. The delay would process the guitar sound as you'd expect it. Then the chorus will process all of that, delay taps included. And last, the distortion will process all of that once more, distorting the chorused and delayed guitar which should technically ruin everything you're trying to accomplish and should serve lesson to always put the distortion first in the chain. 

For each of the four FX units, Klystrack uses a fixed signal chain which goes Chorus > Delay > Crusher. In the software, these are called Stereo, Reverb and Crusher respectively, but I can't bring myself to call the first two that way. It's like calling a pixel "an image-dot" or calling a car "a moving people box". Let's call a dog a dog and use the proper terms for these effects shall we? We shall. Right then, moving on...

multiplexer
We'll start with the weirdest effect, because...reasons. What the multiplexer does is basically cycle through each of your channels one by one, playing the sound of the one it's on for a specific number of ticks while muting the others. Sounds confusing? Read on, it gets easier.

The multiplexer, also known as the what-the-hell-is-going-on effect.
Period is the number of ticks that each channel will play for. So for example let's say you have a song with four channels, running a speed 06 (6 ticks per row) with the multiplexer's Period set to 3. When you press play, the first row (00) will play only what's in channel 0 for the first three ticks, then only what's in channel 1 for the last three. On the second row, it will play channel 2 for three ticks, then channel 3 for three ticks and then this restarts from channel 0 on the next row and so on and so forth. Since this value is expressed in ticks, the lower the number, the faster the multiplexer will cycle through your channels.

Inaccuracy is a setting that will mess with the pitch of each note played in the song. Values range from 00 to 12. What it seems to do is grossly quantize the pitch of your notes. For example at it's highest setting, it really doesn't matter what note the multiplexer encounters, it will always play the same. At a slightly lower setting, it will group C,D, and E together at the same pitch, then F, G, A to another etc. All of these pitches are approximated and often discordant and this just as it was intended, the multiplexer is meant for glitchy experimental music.

crusher
The crusher is an effect that performs three functions. The first is bit crushing (hence the name) which reduces the bit depth of your sound. The second function is downsampling which reduces the sample rate of your sound. And the last function is a dither which smooths out the overall result of this effect. 

Ze bit crusher. Used to crush bits, should bits require to be crushed.
BITS is the number of bits by which to reduce. The bit depth of a sound is the "vertical" resolution of a digital sample. If you look at a waveform, you will see three lines. The one in the middle is 0, and the top and bottom lines represent the maximum bit resolution you have. The higher the bit depth, the more vertical "slices" you have between 0 and the top/bottom values. Remember that this is binary, not decimal, so for example 2 bits can express 4 numbers (00, 01, 10, 11) which would translate in a +2/-2 range for a waveform: two above zero and two below. This grows exponentially as you add bits. At 16 bits, you have a range of 65536 possible numbers, effectively giving you a range of +32,767/-32,768. The more you crush the bit depth, the lower the quality of the sound, and the closer to a pure digital square wave (1bit) you get. Since you are losing vertical resolution, you are also losing the ability to ramp up smoothly in volume so things like the volume envelope will start breaking up as you increase the BITS value. This effect can, in some ways, be used to create distortion effects or make some instruments sound more noisy.

DSMP is the downsampler. Values range from 00 to 64 and the higher you go the lower your sample rate gets. If the bit rate is the vertical resolution, then the sample rate is the horizontal resolution of a digital sound. Put (very) simply, the higher the sample rate, the more horizontal "slices" can be played per second. In rough not-too-technical terms, this means you can play higher frequencies more accurately. By downsampling a sound, you are effectively reducing the number of samples per second and thus, your ability to have proper high frequencies in your sound. On simple waveforms like you get from the synth's oscillators, this effect will give a lo-fi quality to your instruments. Be careful though, as you will quickly lose the ability to play high notes as you increase the DSMP value. Used creatively, when the sample rate syncs up with the frequency of your note, this can create pleasing "bell" sounds, or give nice tremolo effects.

Dither is the application of noise patterns to smooth out gross quantization. This permits a signal to be of relatively low quality, but still retain parts of its original character and sound. In Klystrack, the dither is very crude so do not expect it to make a crushed/downsampled instrument sound like the original signal, but it can be used to smooth out the effect if it gets too rough. It will introduce a sort of noise to your signal, which is very interesting when you want to achieve a certain lo-fi quality, which I assume is what you're going to be using the crusher for in most cases anyways.

The Volume is used to keep sounds in check. As explained before, reducing the bit depth of a sound has a tendency to increase the volume. This setting is basically just an adjustment to bring back a rogue sound at more manageable levels so you are able to mix it with the rest of the song without having to boost everything else in the stratosphere. 

chorus
A chorus is a time, and pitch-based effect that basically makes a copy of your sound and delays it a bit from the original while applying slight pitch variations. Klystrack's chorus is a little different from most chorus effects in that it uses the same settings for both the time delay, and the pitch modulation. While this is less flexible than a standard chorus, in most cases it will do just fines as very rarely will you want to drown your sound in thick chorus, and if you do you will probably want to go all out bat shit crazy anyways. 

It's called stereo, but it's really a chorus, dammit.
Now I don't know all the details on how this particular chorus was programmed, but what it seems to be doing is making a copy of the original sound, and applying the effect to both the copy and the original at opposite polarities. Meaning that when one of them is chorused at "+25ms" then the other one is chorused at "-25ms". I might be wrong, but since you lose the original signal entirely through this effect, I doubt that it would have been programmed to make two copies and then mute the original signal. But hey.. what do  I know?

Min/Max are two settings used to determine the minimum and maximum amount of delay that will be applied to the copy of your original sound. The chorus will oscillate between this two values according to the speed you set in Mod. Values here are in milliseconds, from 0.25ms to 25.5ms.  Note that these values are also used to determine by how much the pitch of the sound will be modulated.

Phase is the separation between channels (audio channels.. meaning left and right). Values go from 00 to 40, which essentially means from having the two signals dead center (mono) to having them completely separated left and right. Any value above 00 will give your sound increasingly bigger spatial placement. This can be very useful to separate two instruments that tend to muddy up each other in a mix. If two of your instruments are competing in frequencies and bury each other, try leaving one in mono, and then chorusing the other one into the hard left/right.

Mod is the speed, in hertz, at which your chorus will oscillate between the values set with Min/Max. Again, just to make sure the message came across, this affects both the delay and the pitch modulation of the effect. Also, this affects both the delay and pitch modulation. And always remember that it will affect both delay and pitch modulation.

delay
Yes, it's called reverb, I know. And technically speaking it is a reverb since its taps are only played once. But to achieve a realistic reverberation effect, you'd need a metric shit ton more taps than the 8 that are offered here. And yes, I know, it's not a delay either since the taps do not repeat according to signal feedback and bla bla bla. Point is, at the end of the day you will use this for delay effects about 99% of the time, so there. And while it is neither usable as a reverb, or definable as a delay, this effect offers you a lot of possibilities with the way it is set up. With this effect, you'll be able to create (very) short reverbs, delays that can be synced to the tempo of the song, chorus effects without pitch modulation and flangers. Think of time as a time-based effect factory.

The big box of taps. Used for tap-dancing, mostly.
Roomsize, Volume, Decay and Set are settings that you use to generate the time and volume of each tap automatically. Those settings do not go very high, and thus will tend to produce exactly what was intended with this effect: SNES-like reverbs. That is, short and quickly fading echoes. Roomsize will determine the time of each tap. The higher the value, the longer the time between taps. Volume will decide at which volume the first tap is while Decay will determine how fast they fade out. Once your setting are where you want them, press Set and they will be applied to the taps.

Spread is kind of like the chorus effect and will only affect the taps, not the original signal. Values go from 00 (mono) to FF (complete separation left and right). Just like the chorus, this can be used to push a sound outwards from the center of the mix, but unlike the chorus there is no pitch modulation applied here.

Editing the taps yourself however, is where this effect shines. There are two settings to each of the 8 taps available. The first is the time, which can be expressed either in milliseconds, in increments of 1ms, which is what people used to "real" effects might prefer to use. Or you can have it in ticks, in increments of 0.05 ticks which might be more up the alley of people who learned music in trackers. In both cases, the increments are the same, 1ms = 0.05 tick. The second setting is the volume which is expressed in how many decibels away this tap will be from the original signal's volume.

Take a look at the settings shown in the above image. Each tap is 100ms apart starting at 50, and each tap is -3db lower than the previous one. What that means is that 50 milliseconds after a sound is sent to the delay, the same sound will play again 3 decibels softer, and again at 150ms, this time 6 decibels softer than the original volume and so on until all 8 taps have player.

You will notice there's a button between each set of arrows for the time. In the image above, these are marked with 0, 1, 2, 2, 3, 4, 5, and 6. The number represented here is a rough approximation of how many pattern rows away from the original note this particular tap will play. You can press this button to set the timing exactly to that number of rows. For example if you want a tap to play precisely two rows after your note is triggered, then move the ms/tick setting until you see the number 2 on the button, then click the button. This will adjust the timing to precisely what it needs to be to hit at exactly 2 rows. Note that while the actual the timing for each tap is not affected by the song's speed, the number shown on this button will actually change to show you the number of rows it represents at the new speed. If you change your song's tempo mid-project, it would be a good idea to re-set your delays to fit the new tempo.

Similarly, there are two buttons next to the arrows for the decibel setting. -INF means minus infinity, which essentially means this tap is silent and will not be heard. The 0 button is the opposite and sets the tap's volume to a 0db reduction, meaning it will play at the same volume as the original.

For classic delays, pick a number of rows, and increase each tap by that same amount (1,2,3,4,5,6,7,8 or 2,4,6,8,10,12,14,16 or 3,5,9,12,15,18,21,24 for example). Make sure each new tap is played at a lower decibel value than the last and there you have it, a bread n butter type of delay. You can of course get much more creative with it, but since you have four separate FX units, it's always a good idea to have one generic delay on hand.

By using very low values for the times, you can also create flanger and chorus effects. Setting a single tap  to 1ms with a 0db reduction will essentially give you a second identical copy of your sound delay by a single millisecond, thickening its sound and changing its timbre. Play around, explore the values and you'll discover a ton of ways to change the timbre of your instruments this way. Be careful not to use values that are too high for the timing, otherwise you'll fall in reverb/delay territory. 

And so that's about it for the FX units do and what each setting is used for. Remember that nothing beats noodling around, so explore and have fun and you'll find that these effects extremely useful for the sound they open up, and the time they save. Hell, who wants to waste channels and time to edit echoes by hand in this day and age?

Stay tuned, next time we'll go over how to personalize the Klystrack settings to suit your needs. And after that, with all the technical details out of the way we'll finally get to dig in the fun stuff and make some actual music.

02/03/2013

klystrack tutorial - instruments

For the second "tutorial", we'll be looking at the instrument page and what every option means. I put tutorial in quotes because this is turning out to be more of a user manual than an actual how-to, but I really want to cover all the options before we start with the tutorial-y part of the tutorials.

Klystrack's synthesis engine is a  mixture of C64, Amiga and Atari ST in that it does most/all of what these computers were famous for. People that are already familiar with chip tracker synthesis should feel right at home in this screen, but people used to traditional synths might find it a little awkward since all the options are scattered across the screen in a strange order and some have weird names.

top bar and list
"Inst" is secret coded language, it really means "instrument". I know right?
Alright, let's dive in. The first thing you'll see on the instrument screen is the top bar, and the instrument list. On the left side of the top bar you have up/down buttons that are used to pick which instrument is currently selected for editing. Next you'll have this big empty space in which you can click to enter a name for that instrument. And at the very end of the bar on the right side, you'll have load/save buttons whose function I'm pretty sure you can figure out by yourself. Depending on how you work, you might want to save all your instruments in neatly categorized folders, or do like I do and always edit new instruments from scratch. Since chiptunes are somewhat limited in sound textures, having fresh instruments is one thing that will set you apart from the horde.

So go ahead and select instrument 00. When you select an empty instrument there will be this boring triangle wave sound as preset which you will invariable always want to change to something else. The first thing you should do after selecting which instrument to edit, is give it a name. The reason for this is that you don't want to have to scroll to your instrument list, triggering notes as you go, just to find that one sound you know you made just a few minutes ago. It will also help you not delete valuable instruments later on by thinking it's an empty slot. I don't think there's a limit to the number of characters you can put in there, or if there is one it's large enough to basically blog with. As such, I suggest you take the four seconds necessary to enter a descriptive name for each instrument. This will be a time saver later on when you're editing your song and selecting instruments directly from the main screen.

Now let's look at all the options available for creating sounds. I will separate them in five sections because of the way they are presented on screen, but just remember that a lot of these options were added in later versions and placed where ever there was some screen real-estate available. Eventually I'm sure they'll be reordered into something more sensible, at which point I will have to edit this tutorial, heh. I am also leaving out the FM part of the instrument panel for this tutorial. The FM section will get its own tutorial later down the road.

general settings
Note that saying "k'ync! vib vib k'sync!" out loud will summon Cthulhu.
Base is the base note that will be played when you play a C. By default is it set to C-4 so when you input a C note in a pattern, it is actually a real C. If you need to transpose up/down to another pitch, then you can use the up/down button. If you move C-4 up to D-4, then when you enter a C in a pattern, it is in fact playing a real D. This semitone tuning is useful when you are dealing with samples that are at some random pitch, or when a combination of effects (ring, buzz, sync) actually pitch a sound to something else that a C. You can then use this to put the sound back in it's place to simplify your editing, knowing that when you see C in the pattern, it is a C. If you shift-click the up/down buttons, you will transpose by an entire octave instead.

Lock will lock the pitch of the instrument at the note indicated in Base. That means that no matter what note you input in a pattern with that specific instrument, it will always play at the same pitch. This is very useful for sounds whose pitch you want to remain stable throughout a song, such as a kick or a snare.

When the Drum setting is on, as it is by default, your instruments will have this very short noise sound played at the beginning. This is a classic chiptune trick to add some "snap" to sounds, especially percussion instruments. Historically this was done by hand in the instrument's program, but since it's such a common thing to do, klystrack offers you an option for it directly instead. You can still do it the oldschool way by turning oscillators on/off in the program if you prefer to do everything by hand. Note that the noise that is played is actually this instrument's noise oscillator, and will thus be subjected to all the pitch/ring/sync settings you have going on. If you have Drum turned on, and are using the Noise oscillator at the same time, it will not stack since it's the same source being played. 

Ksync is short for Key Sync. What that means is that every single oscillator for this instrument will be restarted from the beginning every time a new note is played. That includes all the audible oscillators, as well as the LFO used for the buzz effect. When you have it on, you will be assured that your instruments always sounds the same when it is triggered in a pattern. If you leave it off, then the oscillators will be free and that will introduce unpredictable variations over time. Both settings are useful depending on your needs. Using the buzz effect on an instrument can sometimes introduce some kind of "slow movement" in your sound and you might want to have this flow freely, independently from the notes you trigger. In that case, leave Ksync off. And for those moments when you want to make sure each note triggers perfectly the same way all the time, turn this baby on.

The Vib button will turn vibrato on and off for this instrument. You will remember something similar from the last tutorial and it is indeed the exact same setting. If you leave this setting off in the instrument, then you can turn it on/off at will directly from patterns. Note that if you turn it on from a pattern, it will remain on for the duration of that note. If you turn it on however, the pattern's vibrato control bit will actually turn the vibrato off  but only for rows where the bit is set. This might seem like an odd choice, and hell it might even be a bug, but it gives you amazing control over vibrato effects straight from the pattern. There are more settings for the vibrato effect, such as depth, speed and delay, but these are in another panel so we'll get to them a bit later. I wasn't kidding when I said the options are all over the place!

Set PW actually means Reset Pulse Width Modification. If your sound is made out of a pulse wave (getting to that very soon) when you can have the duty cycle of the pulse wave be modified by a dedicated LFO whose speed, shape, and depth can be, again, set in another panel. By default this LFO is free flowing and will not reset with new notes, giving your sound a very organic movement over time. If you'd like your sounds to always restart from the same pulse width however, you can turn this on. This entire function is however a bit wonky and I would suggest leaving it on most of the time or you will risk having the pulse width go out of range and your notes will briefly disappear when it gets too high.

The Set Cut function is very similar. This will Reset the filter's Cutoff on each new note. Klystrack as a multimode resonant filter included and this option will simply make sure that every time a new note is triggered, the filter's cutoff will be reset to what is selected in the filter section. In most cases you will want to have this on for general purpose instruments. But if you are looking to make long filter sweeps over a large selection of notes, having it off will be more useful as you can set pattern effects to "slide" the cutoff up or down by discreet amounts. Note that the Set Cutoff pattern effect will always override this, meaning that you can have a general cutoff setting for most of your notes, but if you want to change the cutoff for a specific note, then the pattern effect takes priority over the instrument's filter settings.

The last option in this panel, Slide represent the speed at which note will slide to new pitches when the slide control bit is used in a pattern, as seen in the previous tutorial. The high the value, the faster the new note will slide from the last note's pitch to its own. Note that this is a relative "pitch speed" and not a "pitch over time" effect so the longer the interval between two notes, the longer it will take to slide from one to another regardless of this setting. If you'd rather have your notes slide from one note to another in a set period of time instead, you will have to get creative with pattern effects, and we'll get to that later in another tutorial.

oscillators
Oscillators for everyone! Get'em while they're hot.
Here I am grouping two panels. The actual oscillators, and the wave samples. The reason that I'm grouping them together is because in a general way, they are both just sound sources from which you'll create your sounds and they both go through the same processing. There are six sound sources available to you, Pulse, Saw, Triangle, Noise, Pokey and Wave. Each of these waveforms have a specific sound and are pretty much standards in the world of synthesis, even "real" synths. You can turn each of these sources on or off at will. Contrary to traditional synths where each source is played in parallel, klystrack merges them into a single oscillator. That means that where a Moog can play a Pulse and a Saw at the same time, klystrack adds them up together into a single oscillator, so it will sound very different. This might seem like a limitation at first but it is actually pretty cool because it opens up many more oscillator textures than what traditional synths offer. And if you really want to have two waveforms in parallel then there's nothing stopping you from using two instruments on two patterns and use the same notes on both. So in a way, the way klystrack handles it is much preferable.

The PUL button turns on the Pulse oscillator. The three digits next to it represent its duty cycle. The lower the number, the "thinner" your sound will get, and the higher you set it the closer you get to a perfect Square wave (7FF). This oscillator also has extra settings known as Pulse Width Modification, which is found in another panel and will be addressed later.

Saw and Tri basically turn the Sawtooth and Triangle oscillators on and off. The Sawtooth is a bit less "electronic" than the Pulse and is usually used for smoother textures. The Triangle waveform is something that sounds somewhat between a pure Square (harsh) and a Sine (very very smooth). If you've ever played a NES game in your life, this is usually the waveform used for basslines and flute-like sounds.

The Noise oscillator is a basic white noise. However, contrary to most traditional synths where the white noise is always the same no matter which pitch it's being played at, the noise in klystrack varies with pitch. The lower the pitch (the Base option in the general settings) the darker it will sound, and as you go up in pitch, the brighter it will be. This is incredibly useful for percussive sounds with a snare sounding best with a mid-pitch noise whereas hihats will definitely sound better and the maximum pitch. 

The Metal button will instantly make every song you make into a remix of Iron Maiden's Run To The Hills. However it is not yet fully implemented so for the moment, what it actually does is add a sync effect to your noise, effectively turning it into a very harsh noise-like, but tonal oscillator. Unfortunately doing so will also drive the pitch slightly between tones and it's not really possible at the moment to bring it back in tune with the rest. This is somewhat of a bug and I am sure it will be fixed in later versions. For the moment, it remains useful for hash percussive sounds that do not need to by in tune with the song.

Pokey is a mystery to me. It is some kind of emulation of a specific Atari ST function that entirely escapes me. Suffice to say it will produce extremely glitchy sounds that defy the laws of pitch. Every note will trigger some different unpredictable bleep. You can select 16 variations of those bleeps. Might be useful for percussive sounds and weird sound effects but there's not much musicality you will obtain from this.

The 1/4th button will simply make all your oscillators play at a quarter of the pitch. This can be useful for bass sounds, but is best used on "silent instruments" to act as LFO for ring/sync effects. This will get clearer in a later tutorial and is a bit outside the scope of the current one. For now though, suffice to say it plays your sounds at a quarter of the pitch, so much much lower.

Wave will use a sample as oscillator. Samples are loaded, generated or even hand-drawn from the Wave Editor screen and then selected in the Instrument Editor. By default an instrument is set to wave 00, meaning that if you activate this oscillator, it will use the sample located at position 00 in the Wave Editor screen. You can change that to any of 128 available wavetable position using the up and down arrows. There is technically no difference between using one of the oscillators, or a wave. The selected sample will  be used as if it was one of the oscillators and get processed the same way. Instead of loading an external sample, you can also generate a basic Sine wave directly from the Wave Editor meaning that you can use it as just another pure oscillator if you want. The ability to then draw variations with the mouse directly on the wave itself means that you have access to tons of textures that would not normally be available.

Turning 0Env on means that the sample will not be processed by the volume-based modulation. That means it will bypass the volume envelope, the buzz effect, and the ring modulator. Filter, sync and vibrato will still affect the sample normally.

The L button is to lock the pitch of a wave. The frequency at which the sample will be locked is dictated by the Rate option in te Wave Editor

volume envelope
Classic ADSR, which of course means Advanced DungeonS and dRagons.
Each instrument in klystrack as its own ADSR envelope to modify how sounds are faded in/out and sustained. Each step in the envelope can be set to values ranging from 00 to 1F. The envelope is used to give movement and expression to your sounds.

Volume is pretty self explanatory. The default value is 80 and it can be adjusted from 00 to FF. It is good practice to keep your "full volume" sounds at 80 and not FF. That way if you need to bring softer instrument in front of the mix later, you'll have that much more headroom to achieve this.

The Relative button determines whether or not the volume and its envelope are absolute values or will be relative to the values in the volume and effect columns of your patterns. If it is left off, then entering a value of 40 in the volume column of your pattern will play the sound at an actual volume of 40. If Relative is turned on, then a value of 40 in the volume column would mean to trigger the sound at half the instrument's volume value. Remember from the last tutorial, the volume column values range from 00 (0% relative) to 80 (100% relative).

Atk determines the attack of the sound, which basically is how fast the sound will fade from nothing to its full volume. By default this is set to 01, which will pretty much play the sound instantaneously when a note is triggered. You can set it down to 00 for an even faster attack, but not that this will introduce an audible "click" at the beginning of each note. It's not much of a problem with harsh or percussive sounds, but it will become very audible on softer sounds. The higher the value, the slower the sound will fade in.

Dec defines decay, or how fast a sound will fade from its full volume down to the value found in Sus. By default it is set to 0C which will give you a sounds that fades is about 2-3 seconds.Shorter decay time will reach the sustain quicker while higher values will fade more slowly.

Sus is the volume at which the sound will be sustained after it's done with decay. By default it is set to 00 and if you leave it there the sound will die after decay. Moving this value up will sustain the sound indefinitely at the volume you select. The only way to stop the sound at this point is to trigger a new note in the same channel, or give it a release command.

Rel is the release portion of the envelope which acts pretty much the same way as the decay does. It will fade the volume from the value found in Sus, down to complete silence. The higher the value, the slower the fade. If you plan on using sustained sounds that you want to stop quickly, it is suggested to use a value of 01 instead of 00 for the same clicking reasons found with the attack portion of the envelope.

instrument effects
As if chipmusic wasn't raw enough, this will mangle your sounds even more.
There are three instrument effects you can use to modify your sound in klystrack, the buzz which is inspired by the Atari ST's original YM2149 buzz envelopes, an oscillator sync, and a ring modulator. These three simple effect can turn the most basic waveform into a a whole new sound.

The Buzz is essentially a volume envelope effect. When you turn it on, you will thus lose the ability to apply the standard ADSR volume envelope to your sound. How this works is essentially just using separate oscillator as an envelope to quickly control the instrument's volume. In a way this is really similar to a ring modulator, but with its own source of modulation. This gives the impression of having two sounds playing simultaneously.

Detune will determine the pitch of this envelope/oscillator relative to your instrument's pitch. For example a pitch of +7 would use an oscillator that is pitched 7 semitones up from your Base instrument pitch. If you play a C, then the buzz would ring out on a G.

Shape will let you select between four different envelopes shapes: double saw up, double saw down, triangle up, and triangle down. All four will give you particular variations since the up/down variations determine whether your buzz envelope starts at full volume or a zero while the double saw and triangle sound different because a saw wave has a harsh amplitude jump from full to zero (or vice versa) while a triangle transitions smoothly between both.

The Fine setting can be use to adjust the pitch of the buzz envelope by minute amounts and will prove useful to bring sounds back in tune with other instruments when your buzz effect sends it a bit off.

The next two effects are grouped together because of the way they are used. Both are simply turned on or off, and a source for the modulation is then selected. The value in SRC represent which Channel will act as modulator. This is not always immediately obvious and can lead to some confusion. If your source is 00 for example, then when your instrument is played it will be synced or ring-modded by what ever is being played in channel 0 at that moment. Note that your modulators do not need to be audible, meaning that you can use instruments with the volume set to 00 in channel 00, and they will still modulate instruments with 00 as their modulation source. This enables you to dedicate a channel to modulation without having it blast awkward nonsensical sounds over your music. You can also press the arrow down from 00 to select FF as the source, which means that instead of using a channel as source, the sound will use itself as modulator.

Sync is a classic oscillator sync. What that means is that your instrument oscillator will play and loop normally until it gets reset by the cycle speed of your modulator's pitch. Sounds confusing? It kind of is. The end result is a harsh sound rich in harmonics. Both pitches from source and destination can be heard in the sound, but the source's pitch will be clearly dominant in most cases. Interesting sweeps can be achieved with the  source's melody coming through your synced sound, and the higher the pitch of the synced oscillator, the thinner the metallic overtones.

Ring is a standard ring modulator, which is essentially another volume-based effect. It will use the source's amplitude to modify your instrument's volume. Classic ring modulators usually use simple waveforms like sinewaves as modulator because more complex waveforms tend to modulate your original sound into noise. Since klystrack uses a channel as a source, this means you will often find this effect to be noisy unless you carefully control what is being used as modulator.

filter
Let the sweeps begin.
Each instrument in klystrack has its own multimode resonant filter. You can select between three types of filters and adjust the cutoff frequency and resonance. The filter is also entirely controllable from pattern effects, or straight in the instrument program.

LP selects the Low Pass Filter, which will only let the frequencies below the cutoff point play, everything above it will be cut from the sound. Useful to make sounds "darker".

HP selects the High Pass Filter, which will only let the frequencies aboce the cutoff point play, everything below it will be cut from the sound. Useful to thin out sounds that take up too much space in the low end.

BP selects the Band Pass Filter, which will only let a band of frequencies centered at the cutoff point play, everything that is too far from that central point is cut from the sound. Useful for "dark to thin" sweeps and limiting the frequencies where the sound sits in the mix.

Cut is the cutoff point where the filter's effect takes place. Values range from 000 to 7FF.

Res is the resonance of the filter, which means that frequencies directly at the cutoff point will be boosted a little. Values range from 0 to 4, with higher values meaning more gain at the cutoff point. This will make your filter less subtle and add a little "scream" at the cutoff frequencies. When using the filter to do sweeps, more resonance will make the sweep sound more pronounced.

extra settings
Using these will definitely make you more popular with the opposite sex.
In this panel, you will find settings for the vibrato, pulse width modification, and FX bus. These settings, I assume, were added in later versions, hence the weird placement. Logically they should be grouped with the vibrato button and the pulse oscillator respectively, but hey...you wanted to use trackers.

FX will simply turn the effect send on or off. When it's on, instead of sending your sound straight to the output, it will instead send it to one the the four FX busses as indicated by the FX Bus option. In the next tutorial we will look at how to use these FX units.

Vib.S is the speed of your vibrato effect. Values range from 00 to FF, with 80 being the center. 00 to 7F will change the speed from slow to fast with a positive shape. 81 to FF will change the speed from fast to slow, with a negative shape. What that means is the shape of your vibrato will be inverted once you go past 80. For example if your Vib.Sh is set to a sine wave, 00-FF will first to UP in pitch before going back down, while 81-FF will first to DOWN in pitch before going back up. This is really only useful for the sine and square shapes, as the saw wave is already offered in both low-to-high and high-to-low shapes while the random shape will simply be unaffected since it's random. Note that the values used here are not in ticks, so syncing your vibrato effect to the tempo is only possible with approximation.

Vib.D is the depth of your vibrato, or how far from the original pitch of your sound will the effect go. Values go from 00 to FF, which translate to +0/-0 to +2/-2 semitones. For most musical purposes you will want to stay below 40 most of the time, with high values being used mostly for special effects.

Vib.Sh is the shape of the LFO used for the vibrato. Sine wave will go smoothly up and down, while the Saw will go from high to low and loop (reversed saw will obviously do the opposite). The Square wave shape will only play the maximum value of your Vib.D depth setting. For example if you were to set the depth at FF (2 semitones) and place a C, your vibrato would oscillator between A# and D, never playing anything in between. The last shape is Random, which will pick a new random pitch in the range of your Vib.D depth setting every time the LFO loops.

Vib.Del is the speed at which your vibrato will be gradually applied to your sound from nothing, up to the full depth chosen in Vib.D. Note that this setting is not linear and changes as you play with the depth of the vibrato. The higher your Vib.D is, the faster it is applied so you will need to add more Vib.Del If you want to keep the same delay time.

The next three settings are for the Pusle Width Modification. Rolls off your tongue doesn't it? In a nutshell, what PWM does is change the duty cycle of your Pulse oscillator (see oscillator section) over time. This gives a sweeping effect to your sound and is one of the staples of C64-era sounds. It's settings are very similar to the vibrato settings.

PWM.S is the speed of the Pulse Width Modification. Values range from 00 to FF and act the same way as with the vibrato speed, meaning that anything above 80 inverts the shape of the LFO.

PWM.D is the depth of the PWM. The PW setting in the oscillator section will act as the "center" for the PWM and the higher the value of PWM.D, the further away from this central point your PWM will move. Note that depending on your PW and PWM.D settings, it is possible for you to reach "outside" the normal range of the PW setting. If you go above 7FF, nothing bad will happen, the Pulse will simply stagnate at 7FF for as long as you are above it. If however you go below 010, your sound will be entirely cut off for as long as your  are below 010. This is normally something to avoid, but it can definitely be used creatively for special effects.

PWN.SH is the shape of the LFO that will act as modifier. You have the same basic shapes here that you have in the vibrato section.

instrument program
This will be confusing at first and needs to be toyed with to understand.
Now this is the fun part. The program is where you go to create complex sounds that go beyond the simple beep. In a way, it is a kind of mini pattern, unique to each instrument, in which you put commands/effects to be executed one another the other. With it you can create arpeggios, filter sweeps, turn oscillators on and off and a whole lot more. For each instruement, the program has two settings, and a confusing column of obscure arcane wizard commands.

No Program Restart is a long and complicated way of saying "envelope trigger" and then have the option act the opposite of how it does on every synthesizer in history. Welcome to klystrack! If you turn this option on, then the program will run (and loop) independently from when the notes are played. By default this is off, which means that the program will restart from the top every time a new note is played with that instrument, which is generally much more useful.

P.Prd means Program Period, which is a fancy way to say how many ticks will each row be repeated for before moving on to the next. It's the exact same concept as the song's speed setting, and these two settings correlate very well too. For example if you have a speed of 06 and a P.Prd of 02, 03, 06, etc... then it is possible to create tempo-synced effects with the program.

In this program, all the standard pattern effect commands can be used, plus a few more reserved strictly for the program. I will not go over each effect you can use here as there are enough of them to justify dedicating an entire tutorial for them later but for the moment remember that the bottom bar act as a tooltip when you are editing the program so you should be able to figure out a lot of effects with experimentation. I will however give a few pointers on how to use the program properly, and deal with the Fxxx effects which are unique to it.

When you are in the Instrument Editor, the TAB key will move your edit cursor between the instrument settings, and the program panel. Since the keys are used to enter commands into the program, you cannot trigger notes while you are editing in the program panel. You will need to TAB out before you can use the keyboard to trigger notes.

If you press the spacebar on a row, you will link it with the row below it. What that means is that both of these rows will be executed at the same time. They are effectively treated as being the same row. There is no limit to how many rows you can link together, you could even have all 32 rows of the program be executed at the same time. Obviously, some commands will cancel each other out entirely, such as a portamento up and a portamento down of the same value. In the image above, you can see that the program uses four sets of two rows. Each of these set will execute a portamento down and filter cutoff down command at the same time.

The Insert key is used to add a row at your current position. It will shift everything underneath one row down. To remove a row from the program, select the row below the one you wish to delete, and press backspace. Everything from your selected row and below will be moved up one row. The delete key is used to delete a command from a row, without having anything underneath move up.

FFxx is the Goto command. When the program reaches this row, instead of playing the row, it will jump to whatever row is indicated with xx. In the above example, instead of playing row 08 the program will jump straight to row 00 again and continue playing the program. This creates an infinite loop and is one of the essential commands you will have to learn to fully work the program editor to its full capacity.

FD00 and FExx are loop commands. Each instrument can have as many loops as you can fit in the 32 rows you are given. FD00 marks the beginning of a loop. Since this is a command that doesn't affect the sound at all, it is often best used if you link it with another row so as not to introduce a one row delay in your program. The loop end command is FExx. When the program reaches an FExx command, it will go back to the last FD00 it encountered for as many times as you indicate in xx. For example FD00 at row 02, and FE04 at row 08 will loop from 02 to 08 four times. Note that "FE00" means an infinite loop and is a bit pointless because you could simply use the Goto command instead.

The last program command is FC00, which triggers the release. What the means is that you volume envelope will move to its release stage right away, no matter where you were in the envelope. This comes in handy when you have sounds that you wish to have sustained at a precise volume for a while, but you want them to end eventually without having to call a release command directly from the patterns. However, I do suggest you always trigger your releases from the patterns, it makes it much more clear for you where sounds start and where they begin in the patterns directly.

And there we go. That's about it for the instrument page. Now that you know what each option does, I encourage you to experiment. There is nothing better than the hands-on approach to learn stuff and no amount of reading up on a subject will replace just noodling around with the tools. Next time, we'll explore the FX page and what each option there means. After that we'll be done exploring the pages and we'll start with the real fun stuff, what the pattern effects are and how to use them, as well as how to program a few simple basic sounds.

Damn this was long to write. No doubt there's a lot of typos in there so please point them out to me by email if you spot any.